Wednesday, November 30, 2011
 12:32 PM | Posted by
Abstract |
12:32 PM | Posted by
Abstract |

Supplies:
Tube of Choice. I'm using the art of Rene Kunert. You can find her work here.
Scrap kit of choice. I'm using a FTU kit by Vaybs. You can get the kit here.
Fonts of choice. I'm using Rudolfo Swash.
Animation of Choice. I'm using Pixie Dust by Simone which can be found here.
Filters: Penta-Jeans.
I assume you have working knowledge of Animation shop and PSP. This tutorial was written using PSP9.
Open a new image with the dimensions of 575x275.
In your kit, find a paper that will match your tube of choice. The paper I used is the one with the number 2. It is the green one with the red writing.
Copy and paste it as a new layer. Now open your tube and copy and paste it above that layer. Position it where you like.
Find a frame from the kit. If you aren't using the same kit, see if the one you have has one. If not, improvise. lol
Copy and paste the frame under the tube layer. Move it so that it's not covered by the tube.
Now, using your magic wand tool, select inside the frame. Modify>Expand by 10px. Create a new layer and flood fill with a contrasting color. Rename the layer to Frame Background.
Deselect and move that layer under the frame layer. Now copy and paste a close up for your tube above that new layer. Position it so that it's inside the frame.
Activate the layer you made, slections>Select all>Float>Defloat>Invert. Now hit the close up layer and hit delete. Deselect all.
With the close up layer, you want to duplicate it. Set the bottom close up layer to Luminance. Set the top one to screen and drop the opacity to about 60.
Now, apply Penta>Jeans on the default settings to the top close up layer and then the background layer for the frame.
Here comes the part where your creativity comes in. Find some elements and paste them into the image however you like. Put some under the frame and some above it.
Make it look awesome! I'm not going to tell you how to place the elements, it's your tag. I placed some above the tube as well just to give it a nice little effect.
Now, let's create a border above your top layer. Create a new layer, Select all, Modify, Contract by 10. Invert and flood fill with a color of your choice. Deselect.
Add noise. Set to 50% and the random box checked.
Add your copyright info and name. Do this now so you don't forget. If you don't feel comfortable animating, you can stop here. Just save as a .jpg
Let's cut this file down a bit so it's easier to work with. Close off your background layer. (The first one we made with the paper). Merge visible.
Here comes our animation part.
Close off the top layer so that only the background remains. Copy merged and then paste into Animation shop as a new animation.
Open up your animation of choice. I'm using one by Simone. If you are a Photoshop user, she does allow converting.
The animation I'm using is the Pixie Dust animation, but anything works.
Find out how many frames you need by selecting all frames on your animation. It should be in the bottom right corner of the screen. :)
Now, go back to the new animation you made. Hit Ctrl+L until you have a matching number of frames in your new animation. If you use the same animation, it's 36 frames.
Select all frames on the animation you've been working with (the one with the background layer)
Go back to the pixie dust animation and select all frames.
Copy and then paste into the current frame on your other animation. If you use the same animation. Do it twice. Once near the left side, and once near the right side.
Now, go back to PSP and close off the bottom layer and open the top one. Copy merged and paste into Animation Shop as a new animation. Hit Ctrl+L until you have the matching number of frames.
Select all layers and copy. Then paste into the selected frames on your working animation. Same way you did your pixie dust.
If at anytime your animation looks bad, feel free to hit undo and mess with it.
Save as a .gif and enjoy!
Any questions, feel free to email me. :)
Tuesday, November 29, 2011

You will need:
Tube of choice. I'm using the art of Scott Blair. You can find his art at PTE.
Fonts of choice: I'm using Snowflake Letters and Faux Snow. Both can be found at dafont.com
Scrap kit of choice. I'm using Bel Vidotti's A Taggers Christmas. It's a free kit and you can find it here.
Mask of choice. I'm using a mask from Vix, you can find the mask I use here. It's the third one down.
Eye Candy Gradient Glow.
I assume you have working knowledge of PSP. This tut was created in PSP9.
Let's get started!
Open a new image, 600x600 and your dpi set to 72, flood fill with white.
Draw a vector circle that will be just around your tube in an arc. If you need to copy and paste your tube to get it right, go ahead.
Now take your font tool and hover it over the edge of the circle you just made. It should turn into an "A" on a little arc as you hover over it.
Click on it and using the font Faux Snow, type out a bunch of letters. It doesn't matter which ones you use, they are all snowflakes.
When doing this part, do a darker color so you can see them. You can change it at the end.
When you get enough snowflakes to go around the circle all the way, select all of them in your text box and turn the color to white.
In your layer tab, find the one for the vector layer. Open it up and close off the circle layer. Convert to raster layer.
Now, apply Eye Candy Gradient Glow to it using a color from the tube. In my case, I used a red. Rename the layer to snowflake animation. Or something else to set it apart.
Here is the fun part. Open the scrap kit. Find a paper that fits your tube and copy and paste it above your white background.
I used paper 19. It's got a different name, but you can find it.
Now apply a mask of your choosing. I used Vix's Big Mask 018.
Using the deform tool. Resize the mask to fit the tag a bit better. Merge the group.
Now take some elements from that kit and arrange them how you like. Make sure they are above your snowflake layer. If they are too big, feel free to resize them.
Stick your tube in there somewhere and position it how you wish. It helps to stick some elements above the tube as well.
Let's create a new layer above your tube. Using your freehand selection tool. Draw a long circle. It doesn't matter if the size is perfect.
Flood fill that area you just outlined with white. Deselect. Add a Gaussian Blur of 20. Feel free to resize the circle if it seems to big for some snow.
When you are happy with your bottom snow layer, duplicate the layer. On the copied layer, set the blend mode to Dissolve. Drop the original layer down to about 50% opacity. Ta da! We just made ourselves a pile of snow. :D
Now here comes the fun part. If you are not going to animate, close off your white layer at the bottom, add your copyright information and your name. Save as a png and enjoy. If you want to animate, let's keep going.
Add your copyright information above the top layer. That way we don't forget.
Close off your white layer and Crop merged opaque. Now also close off the other layers under the snowflake animation layer. Also close off your snowflake animation layer in the process. Merge visible.
Now close off your merged layers and open up everything under the snowflake animation layer. Don't open the actual snowflake animation layer yet!
Merge visible again. Now open all your layers up. This was to make the animation process a bit easier.
Duplicate your snowflake animation once. Rotate that duplicated layer by 90 degrees. Now duplicate that layer you just rotated. Rotate by 90 degrees again. Duplicate the one you just did again and rotate by 90 degrees.
You should now have 4 layers of snowflakes. Close off all of them but the bottom one (or the original in this case)
Add your name above the top layer and let's get rocking. I used the font Snowflake Letters. You will have to type in all caps to get the font to look right. Add any effects you want.
Now, open Animation shop or whatever animation program you prefer.
Making sure that only the bottome layer of snowflakes is showing, copy merged the image and paste in animation shop as a new animation.
Go back to psp. Close off the bottom layer of snowflakes and open up the layer just above it. Copy merged and paste into animation shop after the current frame. Repeat this for the remaining two snowflake layers.
Set your frame properties to 25 and save as a .gif. Depending on what snowflakes you used, it may seem as if it's bouncing.
Enjoy!
Friday, November 4, 2011

What you need:
Tube of choice. I'm using the work of Keith Garvey. You can find his work at PTE.
Filters:
Penta-Color Dot
Vanderlee-Snowflakes
Eye Candy-Gradient Glow
Fonts of Choice-I used LHF Sofia Script. Carpenter script is a good FTU alternative to it as Sofia Script is PTU.
Open a new image with the dimensions of 650x250
Flood fill with a gradient of choice. Either one that is from colors matching your tube or one that compliments.
Above that layer paste your tube a few times changing the position and location. Alternate between the close up if you have that as well.
Here is my example:

Close off the gradient layer. Merge visible. Duplicate your tube layer. On the bottom layer, set the blend mode to Luminance.
On the top one, set it to screen. Drop the opacity to 80%. Apply a gaussian blur set to 2. Apply Penta-Color Dot on the default settings.
Now, take your star tool and draw a huge star with the following settings: Number of sides 4, Radius 3.00. Background Black, Forground transparent. Convert to raster layer. Repeat a couple of times changing the sizes of the star each time. Feel free to rotate them a bit as well. If you don't like the one you created just hit undo.
When you are done with that, close off the tube and gradient layers, merge visible. That way you now just have a layer with just your stars.
Apply a gradient glow on a setting you like using a light yellow. Now set the blend mode for that layer to overlay.
Now create a new raster layer and name it snow1. Apply Vanderlee-Snowflakes. Adjust the settings to something you like. Hit apply. Now create another raster layer named snow2 and repeat, just move the random seed bar a bit at the bottom.
Repeat this until you have 4 layers of snow. Once you have your 4 layers of snow, drop the opacity of each layer down to 60%. Close off all the layers except Snow1. When you do the naming make sure you have snow1, snow2, snow3, and snow4.
Above your top snow layer, paste your tube again. Now, crop merged opaque.
On your tube layer, select all, float, defloat, expand by 3. Create 4 new layers. Name each one TubeGlitter1, TubeGlitter2, TubeGlitter3, and TubeGlitter4.
Flood fill each of them with white. Deselect. Now move your tube layer to the top of each of them. On each TubeGlitter layer, apply noise set to random. Change the number on each layer. Close off all but TubeGlitter1.
Now, using your font tool, write out the word Merry in the top left corner using whatever font you wish. Then write out the word Christmas in the bottom right. When doing this, leave room for a border. You can use any color you want. Apply a gradient glow to it.
Above your tube layer, create a new layer named Border1. Repeat this 3 more times naming the other layers Border2, Border3, and Border4. (see a pattern here?)
On any of those border layers, select all, contract by 8, invert, flood fill with white. Flood fill all the other border layers as well. Deselect.
Now add noise like we did for the TubeGlitter layers. Remember to change the number for each layer.
At this point you can add your copyright info and your name. If you aren't going to animate, add some drop shadows and save. If you are, here we go! Don't add drop shadows if you plan on animating. They make it grainy. :(
Get ready to animate! (the animation part won't be so hard, I promise!)
Open animation shop.
In PSP, make sure your Snow1, TubeGlitter1, and Border1 layer are showing and the others like them are closed. Copy merged.
Paste in Animation shop as a new animation.
Back in PSP, close off Snow1/TubeGlitter1/Border1. Open Snow2/TubeGlitter2/Border2. Copy merged. Paste in animation shop after current frame.
Repeat this for the other set of layers.
Select all frames. Set the frame properties to 20.
Save as a .gif!
Enjoy!
If you want a matching avatar, make an image that is 150x150 and fill with your gradient. Paste your close up tube over it and follow the same steps you did for the background tubes. Then paste your tube over that. Create your border layers and follow the same steps for animation. :)
Friday, October 14, 2011

Supplies:
Tube of Choice. I am using the work of Fetch Art. You can get this tube at ScrapsNCrap. Please do not use it unless you have the proper license to do so.
Template by Missy. We will be using the one labeled finishthistagweek23. You can find them here.
Filters: Xero-Fritillary, Xero-Radiance, and Penta-Jeans Eye Candy-Gradient Glow (optional)
Font: Little Sparrow. You can find that here.
My supplies. You can find them here.
First of all. Turn on some good tunes. It always helps with the mojo. ;)
Open template. Expand canvas size to 900x550. This is only temporary. So don't worry!
Open your tube of choice and paste above the top layer. If you are using a bigger tube (PFD/SnC/BarbJensen) feel free to resize to a working size. Position it where you like.
Now using your crop tool on crop opaque. Drag it to a easier working size for you. Hit ok.
Now, pick a color from your tube. Click the lock transparency button for the square one layer. Activate that layer and flood fill with that color. Repeat for the square two.
Apply Xero-Fritillary on these settings:

Now activate circle 1. Apply Penta-Jeans on the default setting. Do the same for circle 3. If you are working with a lighter tube, feel free to change the color of those circles to something lighter before applying the filter.
Activate circle 2. Flood fill with a lighter color from your tube. Apply the jeans filter as you did before.
Activate the frame back layer. Flood fill with your darker color.
Activate your frame back 2 layer. Flood fill with your lighter color. Repeat for frame back 3 layer.
With either frame back 2 or 3 activated, post your tube over that layer. If you aren't working with a big tube, use a close up. Position within the frame. If you need to resize, go ahead.
Reactivate the frame back layer. Select all. Float>defloat>invert. Activate tube layer and hit delete. Deselect all.
Repeat this for the other frame back layer, just mirror your tube the other direction.
You are going to do this next step for both of those tube layers, so start with either again.
Activate one of them. Duplicate it. On the bottom one (the original) set the blend mode to luminance. On the top one set it to multiply. Also apply Xero-Radiance on the default setting to that top one. Repeat for the other tube close up layer.
Now, on the original frame back layer (the one with the darker color) apply Xero-Fritillary using the same settings as before.
Activate the brush layer. Using the change to target brush, color it either of your colors of choice.
Using the font Little Sparrow set to 100 type out some wording that fits your tag. Convert to raster layer. Add noise set to 50% and on hard. Apply Eye Candy-Gradient Glow in a color that fits your tag (either black or white). Drag it just under you main tube layer.
Position your elements how you wish. I'm not going to tell you how. You can use my tag as a guide though. You can use what is supplied or your own.
Add drop shadows as you wish. Crop merged opaque.
Add your copyright information and your name.
Save as a png and enjoy!
Monday, October 3, 2011
Please understand this is an older tut from my other blog. :)

To see the full size version of the tag you can go here.
Supplies:
Tube of choice W/Close up-I'm using the art of Elias Chatzoudis. You need a license to use his art. You can purchase that here.
Supplies-You can download them here. Please do NOT redistribute these at all or use them in any tutorials without my permission.
Fonts: Velvenda Cooler
You also need working knowledge of Paintshop Pro and Animation Shop.
Open your tube and minimize it in the program. Unzip your supplies.
Create a new image with the dimensions of 600x275 with a 72dpi (per license companies TOU)
Copy and paste your tube as a new layer into your new document.
Create a gradient using colors from your tube. I used a Radial gradiant with the settings like such: 
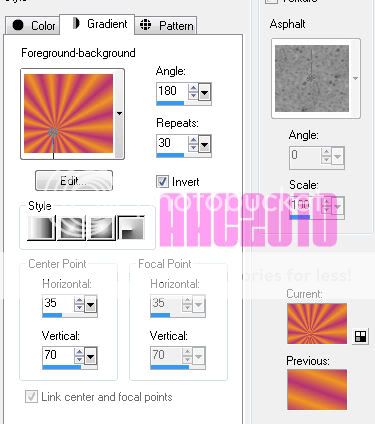
You can move the horizontal and vertical to set the focal point to be behind your tube.
Go to your bottom layer and flood fill it with the gradient. Apply a Gaussian blur set at 8.00
Above your gradient layer paste your close up. Position it where you wish. Duplicate.
On the bottom layer, set the blend mode to Hard Light. On the top close up layer, apply a Gaussian blur set at 1.00. Drop the opacity down to about 50%
Open the star png from the supplies. Copy and paste it above your close up layers. Change the blend mode to soft light. Drop the opacity down to about 65%.
Using your text tool above the star layer, type out rockstar (or whatever you want really) in a nice fat font. I used Velvenda Cooler with a light color that matches the tube.
Drop the opacity down to about 60% and convert to raster layer. Add a gradient glow using the default setting just moved down to a width of 3.0 and the % at 0 with white.
Using your preset shape tool. Draw a few white stars in the corners of the image. Add noise and drop shadow them if you wish.
Now close off the visibility to the main tube layer and the stars you just created. Merge visible. Uncheck them so you can see everything.
Above your top layer. Add a new layer. Select all, Modify, contract 10, invert. Flood fill that area with your gradient. Add noise. Deselect.
Create another layer above that one. Select all. Modify, contract 5, invert. Flood fill with a solid color from your tube. Deselect.
Now you can add your copyright information and your name.
**Quick Tip: If you work with the same artists over and over. It helps to keep a separate psp file with your copyright information already typed up so that all you have to do is copy and paste.**
When you have your copyright information and name finished, you can close off your bottom layer and merge visible.
Open up the supplied animation in AS. Here comes the fun part!
Go back to PSP and uncheck your bottom layer. Activate that layer and hit copy. Over in AS, paste it and then hit Ctrl+l another 28 times. Select all in that animation. Then go to the music note animation and select all there. Copy that one and paste into the new animation you created.
Go back to PSP and activate your top layer. Copy it. Paste it into AS as a new animation. Hit Ctrl+l 28 times again. Select all and copy and paste into the other animation that you placed the music notes.
Save as a .gif. :D
To make a matching avatar. Open a new image with the dimensions of 150x150. Flood fill with the same gradient as before. Copy and paste your tube. Do the same thing as you did before for the borders except on the bottom border, make three different ones with different noise levels. Add your name/letter and copy right information.
Uncheck two of the noise layers. Copy merged. Paste as new animation in AS. Close off that layer in PSP. Open a different noise layer, copy and paste after the current frame in AS. Repeat for the last noise layer. Save as a .gif in AS.
Hope you enjoyed this tutorial. :D
Saturday, October 1, 2011

Supplies:
Tube of choice. I am using the work of Elias Chatzoudis. You can find his art at PTE.
My supplies. You can download these here. Upon downloading them, you agree to not share them or claim them as your own. Direct here for downloads.
Template. I'm using one from Missy. You can find it here.
Filters: Xero-Fritillary and Penta-Jeans
I assume you have working knowledge of Paintshop Pro. This was written using PSP9.
Open temp named finishthisweek28
Expand canvas to a desired size for working.
Copy and paste your tube above the top layer, resize by 80%, sharpen if you wish. Position her where you like.
Activate the bottom layer (should be raster layer 7)
Pick a color from your tube and click the lock transparency button. Flood fill with color of choice. Unclick the lock transparency.
Do the same for the copied layer. (Copy of layer 7)
On those two layers apply Xero-Fritillary on these settings:

If you are feeling frisky, hit random a few times until you see something you like instead.
Now activate the long bar in the middle. (Raster 2).
Choose another color from your tube and flood fill like we did before.
Apply Penta-Jeans on the basic setting.
Activate the black circle (Raster 3). Select all, float, defloat, new raster layer, Expand by 3. Flood fill with white (or another color). Deselect.
Move this layer under raster 3. Apply noise set to 50% and make sure monochrome is checked as well as random.
Activate Raster 3 again.
Apply Fritillary using the same settings as before.
Using your change to target tool, set it to a color from the tube (either from before works) and brush it over the circle.
Using the same tool. Activate each star layer and color them. Feel free to alternate between your color choices.
Activate the back of the film strip (raster 6). Flood fill as we did before with a gradient of choice. I'm using a 45 angle one with two colors from the tube.
Open up your tube again and copy it above that layer a few times. Position it around so it's in the film area.
Merge those tube layers together (just the ones you JUST put there) and then reactivate raster 6. Select all, float, defloat, invert, activate tube layer, hit delete, deselect.
Duplicate that tube layer in the film strip. Set the bottom one to luminance and the top one to screen.
In your supply file you will find a few things to help you decorate the tag, feel free to use them now.
All the elements I used are in there, I'm not going to tell you where to place them, you can do that yourself.
Add drop shadows as you wish. Add copyright info and name. Crop merged opaque. Save as a .png and enjoy!
Friday, August 12, 2011

You Need:
Tube of Choice. I'm using the work of Lorenzo Di Mauro. You can find his art at PTE. Please remember when using his art you need a special license. ;)
Stock image of choice. I found mine at http://www.sxc.hu/
Number Animation. You can download it here. Please do not share. Direct here for the download.
Eye Candy-Glass (any version works)
Font of Choice.
I assume you have working knowledge of Paintshop Pro and Animation shop.
Open a new image with the dimensions 600x275.
Copy and paste your stock image into it. Resize and position it as you wish. Greyscale the image either by using the change to target tool or the hue and saturation option.
Copy and paste your tube over the stock image. You can either leave it the normal color or greyscale it. I greyscaled mine. :)
Above your stock image layer, using the rectangle tool, create a long rectangle with the forground set to black and the background empty. The line should be solid and 10 pixels wide.
Convert to raster layer. Using your deform tool, rotate it so that only the long lines are showing and are diagonal. Between those two lines, using the line tool, create a middle line that is black with dashes. We just made ourselves a little drag strip lol
Convert to raster layer and merge the dashed line with the diagonal lines. Create a new layer. Now activate the drag strip we just made. Using the selections tool, click inside it. Expand by 5.
Go to your layer you just made and flood fill with white. Deselect all. Drag that layer under the lines and drop the opacity down to about 55%.
Create a new layer on top of all of them. Select all, contract by 8, invert and flood fill with black. Deselect all.
If you don't feel comfortable animating, you can stop here and add your copyright information and name. If you are going to animate, then let's continue!
Go over to Animation Shop and open the numbers animation.
Copy the first frame and paste it above the tube layer. Position it where you like. Duplicate it and position if you want a second one ;)
Now, if you did more then one, merge them into one layer. Using your circle tool, with the forground set to black, transparent background, and a line width of 5 pixels, draw circles that fit the size of the number frame. We are making a guide as to where we are going to paste the animation.
Once you are happy, delete the layer with the frame.
On the circle layer using the selection tool, select inside them. Expand by 2 pixels. Create a new layer and apply a glass effect using any eye candy plugin. Deselect.
At this point I would add your name and copyright info. Close off your name, copyright info, the border, and the glass layer. Merge visible with the rest. Open the remaining layers and close off the merged layer. Merge visible on those.
Crop opaque layer.
Now the fun part!
Copy your bottom merged layer and paste as a new animation in AS. Hit Ctrl+L until you have 23 frames. Or you can copy and paste the same layer after current layer until you have 23 frames. Select all frames.
Open your number animation. Select all frames. Copy and paste into your new animation. Position the numbers on those circles you made. If you made more than one, you will have to paste a few times. :)
Now go back to PSP. Copy the top layer, paste as a new animation in AS. Do the same as you did with the first layer until you have 23 frames. Select all and paste into your working animation.
Save as a .gif and enjoy!
I hope you guys enjoyed this tutorial. If you have any questions feel free to email me.
Here is another version I did using the art of Elias Chatzoudis.

Subscribe to:
Posts (Atom)
♥ Proud CT ♥

♥Grab my Blinkie♥

♥Places/People♥


