Showing posts with label Animated. Show all posts
Showing posts with label Animated. Show all posts
Monday, April 16, 2012

Tube of Choice. I'm using the art of KiwiFireStorm. You can purchase his art here.
Texture of Choice. I'm using this one here.
Animation of Choice. I'm using the Mist animation by Lovey. You can find it at the bottom of this post here.
Font of choice. I'm using Weltron and Shit Happens.
It is assumed you have working knowledge of Photoshop. This tutorial was written in CS5.
Open a new image with the dimensions of 625x225. Name the image "Tag"
Open your tube of choice, copy and paste it into the tag. Name that layer "Tube"
Open your texture and copy and paste it under the tube layer. Name it "background".
Create a new layer above the tube layer. Name it "Frame". Select all, modify border of 8 px. Flood fill that area with black. Do this a few times so that you have a clean line.
Add a stroke to the frame layer of 3 px using a color from your tube.
Create another layer between the tube and frame layer. Using your Rectangle Marquee tool, draw a rectangle out across the middle of the tag. Invert and flood fill with black. Deselect.
In the Layer Style window, drop the advanced blending down to 50% and add a stroke that is the same as the frame layer.
Above that layer you just made, using your text tool set to Weltron 24pt, make a line of dots. To do this, you just need to hit Alt+7. Don't make the line too big, feel free to experiment with what size you want.
Rasterize the layer and move it to the top left corner of the tag. Duplicate that line and move it to the bottom right of the tag. Use my tag as a reference.
Activate those two layers and hit Ctrl+G to create a group. Name this group "Line Animation"
Open your animation. Delete the bottom layer. Select all layers and hit Ctrl+G to group the layers. Duplicate group, but find the "Tag" in the dropbox menu and hit ok.
Move that grouped animation above the background layer. Close off all the layers in that group except the bottom one (Frame 2)
At this point, add your copyright information.
Now, find a nice script font. I'm using Shit Happens. Type your name out at 100pt and in the color white. Add a nice dropshadow to it.
If you are not going to animate, save here.
To animate.
Open your Line Animation group. Create another frame in the animation window. In the firt frame, your lines should be where we placed them. In the second frame, move them to opposite ends. So the top one will be at the right and the bottom one will be at the left. You will have to do each layer by itself.
On the first frame, hit the tween button. Tween with next frame and add 18 frames. You should now have 20 frames total.
Now, go back to the first frame and open the group with the other animation. Make sure frame 2 is showing in the first frame. Go to the next frame and close off frame 2 and open Frame 3. Repeat this process going up the frame layers until you do each frame.
Set the display to .1 seconds.
Save for Web and Devices and enjoy!
Sunday, April 8, 2012

Tube of Choice: I'm using the art of Jehsee, you can get his art here.
Kit of Choice: I'm using Flirty Goth 2 kit by Kristin. You can find where to buy it here.
Animation of Choice: I'm using an animation by Lovey. The animation is the Electrical Lovey-11. It can be found here.
Open a new image with the dimensions of 600x600. Flood fill with white.
Copy and paste your tube into it, name that layer "Tube".
Resize the tube if needed.
Open the Frame 1 element. Resize by 85%. Copy and paste it into the tag. Name that layer "Frame".
Move the Frame layer under the tube. Open Paper 1, copy and paste it under the Frame layer.
Close off the paper and tube layer. Using the magic wand tool, click the inside of the frame. Expand the selection by 5 pixels. Invert the selection. Open the paper layer and hit delete. Deselect all.
Open the Wire element. Resize by 90%. Copy and paste it under the Frame layer.
Open the Star Chain element. Resize by 90%. Copy and paste it under the paper layer. Rotate it a little bit. Doesn't matter which direction.
Open the Star element and resize by 50%. Copy and paste it above the tube layer. Position it to the bottom right of the tube.
Open the Heart element. Resize by 50%. Copy and paste it above the star. Rotate it a bit to the left. Position it above the star to the top left of the star. Use my tag as a guide.
Open the Lollipop 2 element. Resize by 50%. Copy and paste it under the tube layer. Rotate it to the left a little bit and move it so that it's sticking out from the side of the tube.
Duplicate the Lollipop element, set the blend mode to Multiply. On the duplicated layer, add a color overlay using a purple from your tube. Set the blend mode on that to color.
Open the Eye element, resize by 70%. Copy and paste it above the star element. Position it under the heart, move it so that the drip from the heart is over it. Use my tag as a guide.
Open the Star and Bones element, Resize by 50% and copy and paste above the lollipop element. Move it to the left of the tube. Flip it horizontally.
Add your copyright information and name. If you aren't going to animate, close off the bottom white layer and save as a png.
If you are going to animate, open the animation.
Highlight the copyright layer and all the way down to the layer under the frame layer. Hit Ctrl+G to group the layers.
Select all layers in the animation, hit Ctrl+G to group them.
Move the animation under the first group you made and center it inside the frame.
Create 20 frames in your animation window.
On the first frame, make sure the Frame 2 layer is the only one open. In the next frame, close off the Frame 2 layer, and open the Frame 3 layer. Continue on this pattern until you do all the frames.
Set the display for all the frames at .2 seconds. Save for Web and Devices and enjoy. :)
Monday, January 30, 2012
This tutorial was inspired by the song "For the Love" by Blue October. Feel free to listen to it while you play. :)

What you need:
Tube of Choice. I'm using the art of Barbara Jensen. You can find her art here.
Kit of Choice. I'm using Sterling. It's a Free To Use kit and can be found here.
Animation. I'm using number 25 from Simone. It can be found here.
WordArt. Right click and save this image here. It's a .png word art.

I assume you have a working knowledge of Paintshop Pro and Animation Shop.
Open a new image, 600x225 with a transparent background.
Copy and paste your tube into the new image, resize if needed.
Open your paper of choice. I'm using Paper7. Copy and paste it below your tube layer. Position it how you like, just make sure the entire background is filled.
Open your frame of choice from the kit. I'm using Frame 2. Copy and paste it into your image. Move it under your tube layer and position it so that it's behind the tube. We aren't going to use this as a "frame". Just some decoration.
Now find a flower you like. I am going to use the Flower Pin. Copy and paste that above your frame. Resize if you need to. Then move it down so that half of it isn't showing. We only want a few petals showing. Duplicate this image and mirror it.
Open a heart element. I'm using the white heart (Pearl Heart). Copy and paste it above your frame layer. Free rotate to the left by 45 degrees. Duplicate that heart and mirror it.
Create a new layer at the top of your image. Select all>Contract by 8>Invert. Flood fill with a grey or black. Drop the opacity to 80%. Add a gradient glow to it. If you don't have Eye Candy, use a drop shadow.
Open the wordart I have provided (or feel free to make your own) and copy and paste it above the background layer. Position it to the left or right of the tube. Duplicate that layer and drag it to the other side. Depending on the background you picked, either the white or black words will show.
Here comes the fun part!
Close off your background and word art layers. Merge visible. Now, close off your top layer, merge visible. Add your copyright information to the top, as well as your name. Merge those down to the first layer.
If you are not going to animate, save now.
In Animation shop, open the animation you have picked. I am using Simone's Animation 25. Cull this animation by removing 1 frame every 2 frames. You should be left with 30 frames. Crop around the animation. so that you don't have a massive image. Delete the first two frames. Minimize this animation. Go back to PSP.
In PSP, close off the top layer and copy merged. Paste into Animation Shop as a new animation. Hit Ctrl+L until you have 28 frames. If you look in the bottom right of the program, it will tell you how many frames you have.
Select all frames. Go back to Simones Animation. Select all frames. Copy and then paste into the other image by Pasting into current frame. Position it above the left wordart. Where the white wordart part is at the top. View animation. If you don't like it, hit undo and repeat until it's where you like it.
Go back to PSP. Close off the bottom layer and open the top layer. Copy merged and paste into Animation Shop as a new animation. Hit Ctrl+L until you have 28 frames.
Select all frames. Copy and paste into selected frame in your working image. (The one you just pasted the animation into)
View Animation. If it looks good, optimize and save as a .gif.
Enjoy!
To make an avatar to match: Create a new image in PSP with the dimensions of 150x150. Copy the bottom layer of your banner into the new image. Copy and paste your tube above it. Create the border like we did before. Add your name or initial and copyright information. Save as .jpg. You can animate it if you wish. I prefer not to.
Sunday, January 29, 2012

What you need:
Tube of Choice. I'm using the tube Precious by Rene Kunert. You can find her art here.
Filters: DSB-Radical Mosaic, Xero-Porcelin, Penta-Color Dot, Twist (default filter), Pixelate (default filter), and Eye Candy Gradient Glow (optional)
I assume you have working knowledge of PSP. This tutorial was written in Paintshop Pro 9.
Open a new image 600x600 (transparent)
Open your tube and paste into your new image.
Using your ellipse tool set to circle, draw out a mid sized circle in the middle of the image with the background set to white and the foreground set to null.
Convert to raster layer and position so that it is covering part of the tube that you'd like to showcase.
Selections>Float>Defloat>Invert Activate your tube layer and hit delete. Deselect all. Move the tube layer above your circle.
Duplicate your tube. On the top layer, using the Change to Target tool, color that layer with a color of your choice. Set the blend mode of that layer to Multiply.
Apply Xero-Porcelin on default settings to that layer. Merge visible. Resize your circle by 85%. Close off that layer.
Copy your tube back on the image again. Repeat the above steps, this time focus on another part of the tube.
Open both of your layers. Position them so that they are sort of overlapping each other. Merge them into one layer. Duplicate that layer twice. Bring the duplicated layers to the bottom. Rotate and flip them around in whatever way looks best. Merge the duplicated layers together.
Apply DSB-Radical Mosaic to the bottom layer. Apply Gaussian Blur set to 10%. Apply Twirl at max settings. Now apply Pixelate set to 22/22.
Drop the opacity on that layer down to 80%. On your top layer, add a gradient glow using a darker version of the color you picked.
Resize the bottom layer by 80%. Copy merged opaque.
Using a nice fat font set to white background, type out something. I used the word Beauty. Drop the opacity to 40% and apply a drop shadow with these settings:
Vert: 1
Horizontal: 3
Opacity: 60%
Blur: 5
Color: Black
Apply that drop shadow to your main tube layer. Apply it again, just changing the Vert/Horizontal to -1 and -3.
Create a new layer and flood fill that with white. Move that to the bottom. Duplicate your twisted layer three times so you have four of them.
Close off the top two, on the bottom, add Penta-Color Dot with the Value set at 100 and the distance set at 5. Leave the other settings alone.
Close off that layer, and go to the one above it. Apply Color Dot but this time change the distance to 7.
Now close off that layer, on the next one above it, apply Color Dot and change the distance to 9. Do it once more for last layer like that, just change the distance to 11.
Add your copyright information and name. If you are not going to animate, save now.
Now, make sure your copied layers are all closed off except the bottom one. Copy merged and paste into a new animation in Animation Shop.
Go back to PSP and close off that layer and open the one above it. Paste into Animation Shop after current frame. Do this until you have all the copied layers done. (These should be the twisted ones)
Once you have 4 frames in animation shop, highlight the first 3 frames. Copy and paste those as a new animation. Select all frames in that animation, Reverse frames.
While those frames are all still selected, copy them. Go back to your first animation. Activate the last frame and then paste after current frame. You should now have 7 frames. Select all frames, set the frame properties to 8.
Optimize and save as a .gif. Enjoy!
Friday, December 23, 2011

You need:
Tube of choice. I'm using the work of Neoracer. You can purchase a license to use his work here.
Background of choice. I'm using a background pack by Abstract Creations (me!) that can be purchased here.
Animation of choice. I'm using this one here. It's my personal creation and I ask that you direct people here to get it.
Kit of choice. I'm using a FTU kit by Kristin. It can be found here.
Fonts: Wintermute.
I assume you have working knowledge of Paintshop Pro and Animation Shop. This tut can be recreated in photoshop if needed.
Open a new image 600x225
Open the fractal pack (or texture of choice) and choose one that you like the most. I'm using the Infinity image.
Desaturate or color using the target tool to match your tube. What I do to desaturate is set my foreground to black or white and use the change to target tool to color it.
I'm making my tag black and white but you can do whatever color you want.
Copy and paste your tube as a new layer. Position how you want. Desaturate the tube.
Open your scrap kit of choice. I'm using a freebie from Kristin that can be found on the Creative Misfits Blog.
If you aren't using the same kit, then feel free to improvise during the next few steps using elements from your kit.
Open Flower1. Copy and paste it into your tag. Resize by 75% and move to the corner of the tag. Duplicate this flower, mirror it and move it to the other corner. I rotated the second one a bit so it wasn't exactly the same. You don't have to do that.
Now open the Flame element.Copy and paste it under your flowers. Move it over to the right or left, your choice. Resize by 75% and position it right at the edge. Use mine as an example.
Open the Doodle element. Copy and paste it above your flame layer. Resize by 75% and position it so that it's just above the flame layer on the side.
Merge the doodle and flame layer together. Duplicate your merged layer and hit mirror. Position a bit lower then the other layer is. Use mine as a guide.
Open the Glitter Trail element. Paste it just above your tube. Move it down to the bottom of the tag.
Activate your top layer. Now add a new raster layer. Select all, modify and contract by 8. Paste your background layer into the image. Hit delete. Deselect.
Crop merged opaque. Now make sure your new border layer is desaturated. Mirror the layer. Apply texture effects-MosaicGlass on these settings:
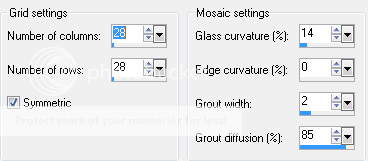
Now move that layer to just above your background. Go back to your top layer and add a new raster layer.
Select all>Modify>contract by 5. Invert and flood fill with a color of your choice. Deselect. Apply noise. I had mine set to 100% and random.
Add your copyright info and name. If you are not going to animate, save as a .jpg and enjoy!
If you are going to animate then let's get to work.
Close off your bottom layer. (your background layer) Merge visible.
Open your bottom layer and close off your top layer.
In Animation Shop, open the animation with MNG in the name. If you animate in Photoshop, I have included the psd file as well.
Minimize that animation and go back to PSP. Copy merged. Paste into animation shop as a new animation. Hit Ctrl+L 3 times. Make sure you only have 4 frames.
Go back to your first animation in Animation shop (the one I provided). Resize so that it is 250x250. Select all Frames. Copy.
In your background animation, select all and paste into current layer. Paste again and move the animation someplace else on the background.
Go back to PSP. Close off the bottom layer and open the top layer. Copy merged.
In animation shop, paste as a new animation. Hit Ctrl+L 3 times. Make sure you have 4 frames. Select all frames. Copy and paste into current layer on the background animation. This is the one we just put the other animation into.
Set your frame properties to 20. Save as a .gif and enjoy!
Wednesday, December 7, 2011

You need:
Tube of choice. I'm using the work of Robert Alvarado. You can find his art at PTE.
Mask of choice. I'm using one from the wonderful Vix. I used Mask 08 from her Mask Set 2. You can find it here.
Fonts of choice. I used Rollergirls and Oh La La.
Filters: Mura's Meister Copies and Eye Candy Corona. You can do this tut without either, but you will have to duplicate by hand.
Texture of choice. I'm using one of mine. You can get it on my other blog here.
This tutorial was written in PSP9 and Animation shop. I assume you have working knowledge of both programs.
Open a new image that is 575x575. Flood fill with white (or a background color that matches any forums you are on)
Copy and paste the texture into the new image. Apply your mask of choice.
Merge group. Rename that layer to "Spin1". Under the adjust menu, hit One Step Photofix.
Duplicate that layer 3 more times so you have a total of 4. Make sure you name them Spin2-4. Close 3 of them off. Leave one open as a reference.
Now, copy and paste your tube over those layers. Position it where you wish.
Using your Rectangle tool, create a bar under your tube layer. Set the forground to null and background to a color from your tube.
Convert to raster layer and apply Muras Copies using these settings:

Open a close up from your tube and copy and paste it over your bars. If you don't have a close up, use your tube and just do it a few times to fill the bars. Make sure you merge all those tube layers together. :)
Go back to your bar layer. Selections>Select all>Float>Defloat. Now modify and contract by 4. Hit invert and then on your close up layer, hit delete.
Set your close up layer to Screen.
Now duplicate your bar layer. Selections>Select all>Float>Defloat. Modify and contract that one by 2. Invert it and hit delete on that layer.
On your original bar layer, apply noise set to Random and 75%. Make sure the Monochrome box is checked. Close off all the layers except the close up layer and the bars. Merge visible.
Using a pixel font (use whatever you like best) write out a saying that fits your tube. Position this between the bars you made. Make sure they are behind the tube layer.
If you want to put a dot between each phrase, use Ctrl+7.
Line it up how you feel it looks best. Duplicate that layer and move it down to between the other bars. You should have a row of text in each blank space between the bars. Reference my tag if needed.
Merge your pixel layers into one. Apply Eye Candy-Corona, making sure the Glow Width is down to 5. Use any color you feel looks good. I did white.
Now above your main tube, using your font tool, write out a word or saying that fits. Use any color or font you want. I used Rollergirls.
Convert to raster. Duplicate that layer. Using your free rotate tool, rotate one layer 90 degrees to the right. Rotate the other one 90 degrees to the left. Position them so that they are on the sides of the bars.
Merge the text layers together. On that merged text layer: Selections>Select all>float>defloat. Modify and contract by 4. Add a new raster layer. Flood fill that new layer using a lighter color. Select none.
On the bottom text layer, apply noise on the same settings as before.
Add your copyright info and your name. If you want your name to match the other text, just do the same thing you did before. Just don't contract by as much. :)
If you are not going to animate, close off the white layer at the bottom and merge cropped opaque. Save as a png.
If you are going to animate:
Close off all the Spin layers and the white background. Merge visible.
Activate the Spin1 layer. Make sure it's open. Rotate to the left by 90 degrees.
On the Spin2 layer, rotate to the left by 180 degrees. On spin3, rotate to the left by 270 degrees. Leave the Spin4 layer alone.
Open all 4 spin layers. Close off the white layer. Merge cropped opaque. Reopen the white layer at the bottom and close off the spin layers 2-4. Make sure spin 1 is open.
Copy merged. Paste into Animation shop as a new animation.
Go back to PSP and close off spin1. Open spin2 and copy merged. Paste into AS after current frame. Repeat this for spin3 and spin4.
Set the frame properties to 25. Optimize and save as a .gif. Enjoy!
Sunday, December 4, 2011

You need:
Tube of choice. I'm using the work of Anna Liwanag. You can find her art at PTE.
Texture of choice. I'm using this one here. You can find plenty of them on dA.
Filters: Mura's Meister-Copies, Eye Candy-Gradient Glow, Xenofex-Constelltion.
Font of choice. I'm using Cake Script. This is a PTU font, a good free alternative is Tagettes.
I assume you have working knowledge of both PaintShop Pro and Animation shop.
Open a new image with the dimensions of 600x225.
Open your tube of choice. Flood fill the new image with a color from your tube.
Now, using a texture of your choice. Copy and paste it above your background. Change the blend mode to Overlay.
If you are using a different texture than the one I linked, mess around with the blend modes to see what looks best.
Copy and paste your tube above that layer. Resize to a size you like.
Apply Muras Copies to the tube layer using the following settings.

Apply it again.
Change the blend mode for that to overlay.
Duplicate that layer 5 times. Close those layers off and merge visible.
Now rename those 4 layers Ani1, Ani2, Ani3, Ani4, and Effects.
Activate the Ani1 layer.Under effects, find the Curlicues filter. It's found under the Distortion tab.
Apply the filter using these settings.:

Close off that layer. Open and activate Ani2. Apply Curlicues again, this time move the Strength up to about 40. Click the clockwise tab.
Close that one off and open/activate Ani3. Apply the filter again this time changing the strength to about 65 and unchecking the Clockwise tab.
Close off Ani3, open/activate Ani4. Apply the filter, change the strength to 15 and click the Clockwise tab.
Open and activate your Effects layer. Change the blend mode to Hard Light. Apply a Gaussian Blue set on 8.
Apply the Antique Mosaic filter (it's found under Textures) using these settings:

Set your Effects layer to about 80% opacity.
Go back to your tube of choice. Copy and paste it above the Effects layer. Resize and position where you like it. Name this layer Tube.
Create a new layer. Selections>Select All>Modify>Contract by 8>Invert. Flood fill that layer with a gradient using two colors from your tube. Deslect.
Rename this layer to Border. Apply noise set to Random>50%. Apply Eye Candy-Gradient Glow set to white. Adjust the size however you like.
Using your font tool. Set the forground to white, the stroke to 2, and the size on 72.
Using the font CakeScript write out the words "Merry Christmas" or "Happy Holidays" whichever you prefer. Convert to raster layer and position where you want.
Make sure the font layer is above the Effects layer.
Apply a gradient glow using two colors from you tube. Set the settings however you feel looks best.
Duplicate your font layer. On the bottom font layer, apply Xenofex-Constellation set to the default settings. Make sure you have the "Keep Original Image" box checked.
On the top font layer, apply a drop shadow. Settings: Vertical=0, Horizontal=2, Opacity=60, Blur=2, Color=Black.
Apply it again.
Now apply that drop shadow to your Tube layer.
Add your copyright information. Add your name using the same font effects as we used for the phrase. Don't forget to do the constellation part. :)
If you are not going to animate, save as a .jpg.
If you are going to animate:
Close off your background layer. That is the layer at the bottom of them all.
Make sure all your Ani layers are closed as well. Merge visible. This is to clean things up and make it easier on us.
Now, uncheck the bottom layer and the Ani1 layer. Copy merged. Paste into Animation Shop as a new animation.
Go back to PSP and close off the Ani1 layer and open the Ani2 layer. Copy merged and paste into AS after current frame.
Repeat these steps for the other two Ani layers.
On your first frame. Add an Image Transition using these settings:

Repeat this on frames 8 and 15.
Go back to frame 1. Copy. Activate frame 22. Paste after current frame. Apply the transition effect on layer 22.
Delete frame 29. Select all frames. Set the display time to 7.
Optimize and save as a .gif. Enjoy!
Wednesday, November 30, 2011

Supplies:
Tube of Choice. I'm using the art of Rene Kunert. You can find her work here.
Scrap kit of choice. I'm using a FTU kit by Vaybs. You can get the kit here.
Fonts of choice. I'm using Rudolfo Swash.
Animation of Choice. I'm using Pixie Dust by Simone which can be found here.
Filters: Penta-Jeans.
I assume you have working knowledge of Animation shop and PSP. This tutorial was written using PSP9.
Open a new image with the dimensions of 575x275.
In your kit, find a paper that will match your tube of choice. The paper I used is the one with the number 2. It is the green one with the red writing.
Copy and paste it as a new layer. Now open your tube and copy and paste it above that layer. Position it where you like.
Find a frame from the kit. If you aren't using the same kit, see if the one you have has one. If not, improvise. lol
Copy and paste the frame under the tube layer. Move it so that it's not covered by the tube.
Now, using your magic wand tool, select inside the frame. Modify>Expand by 10px. Create a new layer and flood fill with a contrasting color. Rename the layer to Frame Background.
Deselect and move that layer under the frame layer. Now copy and paste a close up for your tube above that new layer. Position it so that it's inside the frame.
Activate the layer you made, slections>Select all>Float>Defloat>Invert. Now hit the close up layer and hit delete. Deselect all.
With the close up layer, you want to duplicate it. Set the bottom close up layer to Luminance. Set the top one to screen and drop the opacity to about 60.
Now, apply Penta>Jeans on the default settings to the top close up layer and then the background layer for the frame.
Here comes the part where your creativity comes in. Find some elements and paste them into the image however you like. Put some under the frame and some above it.
Make it look awesome! I'm not going to tell you how to place the elements, it's your tag. I placed some above the tube as well just to give it a nice little effect.
Now, let's create a border above your top layer. Create a new layer, Select all, Modify, Contract by 10. Invert and flood fill with a color of your choice. Deselect.
Add noise. Set to 50% and the random box checked.
Add your copyright info and name. Do this now so you don't forget. If you don't feel comfortable animating, you can stop here. Just save as a .jpg
Let's cut this file down a bit so it's easier to work with. Close off your background layer. (The first one we made with the paper). Merge visible.
Here comes our animation part.
Close off the top layer so that only the background remains. Copy merged and then paste into Animation shop as a new animation.
Open up your animation of choice. I'm using one by Simone. If you are a Photoshop user, she does allow converting.
The animation I'm using is the Pixie Dust animation, but anything works.
Find out how many frames you need by selecting all frames on your animation. It should be in the bottom right corner of the screen. :)
Now, go back to the new animation you made. Hit Ctrl+L until you have a matching number of frames in your new animation. If you use the same animation, it's 36 frames.
Select all frames on the animation you've been working with (the one with the background layer)
Go back to the pixie dust animation and select all frames.
Copy and then paste into the current frame on your other animation. If you use the same animation. Do it twice. Once near the left side, and once near the right side.
Now, go back to PSP and close off the bottom layer and open the top one. Copy merged and paste into Animation Shop as a new animation. Hit Ctrl+L until you have the matching number of frames.
Select all layers and copy. Then paste into the selected frames on your working animation. Same way you did your pixie dust.
If at anytime your animation looks bad, feel free to hit undo and mess with it.
Save as a .gif and enjoy!
Any questions, feel free to email me. :)
Tuesday, November 29, 2011

You will need:
Tube of choice. I'm using the art of Scott Blair. You can find his art at PTE.
Fonts of choice: I'm using Snowflake Letters and Faux Snow. Both can be found at dafont.com
Scrap kit of choice. I'm using Bel Vidotti's A Taggers Christmas. It's a free kit and you can find it here.
Mask of choice. I'm using a mask from Vix, you can find the mask I use here. It's the third one down.
Eye Candy Gradient Glow.
I assume you have working knowledge of PSP. This tut was created in PSP9.
Let's get started!
Open a new image, 600x600 and your dpi set to 72, flood fill with white.
Draw a vector circle that will be just around your tube in an arc. If you need to copy and paste your tube to get it right, go ahead.
Now take your font tool and hover it over the edge of the circle you just made. It should turn into an "A" on a little arc as you hover over it.
Click on it and using the font Faux Snow, type out a bunch of letters. It doesn't matter which ones you use, they are all snowflakes.
When doing this part, do a darker color so you can see them. You can change it at the end.
When you get enough snowflakes to go around the circle all the way, select all of them in your text box and turn the color to white.
In your layer tab, find the one for the vector layer. Open it up and close off the circle layer. Convert to raster layer.
Now, apply Eye Candy Gradient Glow to it using a color from the tube. In my case, I used a red. Rename the layer to snowflake animation. Or something else to set it apart.
Here is the fun part. Open the scrap kit. Find a paper that fits your tube and copy and paste it above your white background.
I used paper 19. It's got a different name, but you can find it.
Now apply a mask of your choosing. I used Vix's Big Mask 018.
Using the deform tool. Resize the mask to fit the tag a bit better. Merge the group.
Now take some elements from that kit and arrange them how you like. Make sure they are above your snowflake layer. If they are too big, feel free to resize them.
Stick your tube in there somewhere and position it how you wish. It helps to stick some elements above the tube as well.
Let's create a new layer above your tube. Using your freehand selection tool. Draw a long circle. It doesn't matter if the size is perfect.
Flood fill that area you just outlined with white. Deselect. Add a Gaussian Blur of 20. Feel free to resize the circle if it seems to big for some snow.
When you are happy with your bottom snow layer, duplicate the layer. On the copied layer, set the blend mode to Dissolve. Drop the original layer down to about 50% opacity. Ta da! We just made ourselves a pile of snow. :D
Now here comes the fun part. If you are not going to animate, close off your white layer at the bottom, add your copyright information and your name. Save as a png and enjoy. If you want to animate, let's keep going.
Add your copyright information above the top layer. That way we don't forget.
Close off your white layer and Crop merged opaque. Now also close off the other layers under the snowflake animation layer. Also close off your snowflake animation layer in the process. Merge visible.
Now close off your merged layers and open up everything under the snowflake animation layer. Don't open the actual snowflake animation layer yet!
Merge visible again. Now open all your layers up. This was to make the animation process a bit easier.
Duplicate your snowflake animation once. Rotate that duplicated layer by 90 degrees. Now duplicate that layer you just rotated. Rotate by 90 degrees again. Duplicate the one you just did again and rotate by 90 degrees.
You should now have 4 layers of snowflakes. Close off all of them but the bottom one (or the original in this case)
Add your name above the top layer and let's get rocking. I used the font Snowflake Letters. You will have to type in all caps to get the font to look right. Add any effects you want.
Now, open Animation shop or whatever animation program you prefer.
Making sure that only the bottome layer of snowflakes is showing, copy merged the image and paste in animation shop as a new animation.
Go back to psp. Close off the bottom layer of snowflakes and open up the layer just above it. Copy merged and paste into animation shop after the current frame. Repeat this for the remaining two snowflake layers.
Set your frame properties to 25 and save as a .gif. Depending on what snowflakes you used, it may seem as if it's bouncing.
Enjoy!
Friday, November 4, 2011

What you need:
Tube of choice. I'm using the work of Keith Garvey. You can find his work at PTE.
Filters:
Penta-Color Dot
Vanderlee-Snowflakes
Eye Candy-Gradient Glow
Fonts of Choice-I used LHF Sofia Script. Carpenter script is a good FTU alternative to it as Sofia Script is PTU.
Open a new image with the dimensions of 650x250
Flood fill with a gradient of choice. Either one that is from colors matching your tube or one that compliments.
Above that layer paste your tube a few times changing the position and location. Alternate between the close up if you have that as well.
Here is my example:

Close off the gradient layer. Merge visible. Duplicate your tube layer. On the bottom layer, set the blend mode to Luminance.
On the top one, set it to screen. Drop the opacity to 80%. Apply a gaussian blur set to 2. Apply Penta-Color Dot on the default settings.
Now, take your star tool and draw a huge star with the following settings: Number of sides 4, Radius 3.00. Background Black, Forground transparent. Convert to raster layer. Repeat a couple of times changing the sizes of the star each time. Feel free to rotate them a bit as well. If you don't like the one you created just hit undo.
When you are done with that, close off the tube and gradient layers, merge visible. That way you now just have a layer with just your stars.
Apply a gradient glow on a setting you like using a light yellow. Now set the blend mode for that layer to overlay.
Now create a new raster layer and name it snow1. Apply Vanderlee-Snowflakes. Adjust the settings to something you like. Hit apply. Now create another raster layer named snow2 and repeat, just move the random seed bar a bit at the bottom.
Repeat this until you have 4 layers of snow. Once you have your 4 layers of snow, drop the opacity of each layer down to 60%. Close off all the layers except Snow1. When you do the naming make sure you have snow1, snow2, snow3, and snow4.
Above your top snow layer, paste your tube again. Now, crop merged opaque.
On your tube layer, select all, float, defloat, expand by 3. Create 4 new layers. Name each one TubeGlitter1, TubeGlitter2, TubeGlitter3, and TubeGlitter4.
Flood fill each of them with white. Deselect. Now move your tube layer to the top of each of them. On each TubeGlitter layer, apply noise set to random. Change the number on each layer. Close off all but TubeGlitter1.
Now, using your font tool, write out the word Merry in the top left corner using whatever font you wish. Then write out the word Christmas in the bottom right. When doing this, leave room for a border. You can use any color you want. Apply a gradient glow to it.
Above your tube layer, create a new layer named Border1. Repeat this 3 more times naming the other layers Border2, Border3, and Border4. (see a pattern here?)
On any of those border layers, select all, contract by 8, invert, flood fill with white. Flood fill all the other border layers as well. Deselect.
Now add noise like we did for the TubeGlitter layers. Remember to change the number for each layer.
At this point you can add your copyright info and your name. If you aren't going to animate, add some drop shadows and save. If you are, here we go! Don't add drop shadows if you plan on animating. They make it grainy. :(
Get ready to animate! (the animation part won't be so hard, I promise!)
Open animation shop.
In PSP, make sure your Snow1, TubeGlitter1, and Border1 layer are showing and the others like them are closed. Copy merged.
Paste in Animation shop as a new animation.
Back in PSP, close off Snow1/TubeGlitter1/Border1. Open Snow2/TubeGlitter2/Border2. Copy merged. Paste in animation shop after current frame.
Repeat this for the other set of layers.
Select all frames. Set the frame properties to 20.
Save as a .gif!
Enjoy!
If you want a matching avatar, make an image that is 150x150 and fill with your gradient. Paste your close up tube over it and follow the same steps you did for the background tubes. Then paste your tube over that. Create your border layers and follow the same steps for animation. :)
Monday, October 3, 2011
Please understand this is an older tut from my other blog. :)

To see the full size version of the tag you can go here.
Supplies:
Tube of choice W/Close up-I'm using the art of Elias Chatzoudis. You need a license to use his art. You can purchase that here.
Supplies-You can download them here. Please do NOT redistribute these at all or use them in any tutorials without my permission.
Fonts: Velvenda Cooler
You also need working knowledge of Paintshop Pro and Animation Shop.
Open your tube and minimize it in the program. Unzip your supplies.
Create a new image with the dimensions of 600x275 with a 72dpi (per license companies TOU)
Copy and paste your tube as a new layer into your new document.
Create a gradient using colors from your tube. I used a Radial gradiant with the settings like such: 
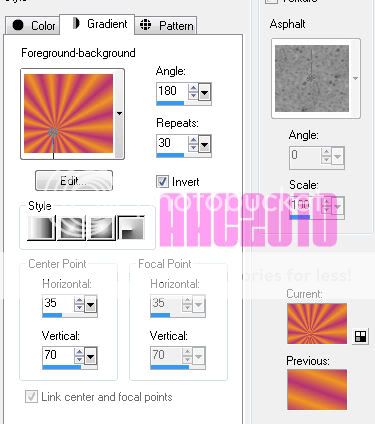
You can move the horizontal and vertical to set the focal point to be behind your tube.
Go to your bottom layer and flood fill it with the gradient. Apply a Gaussian blur set at 8.00
Above your gradient layer paste your close up. Position it where you wish. Duplicate.
On the bottom layer, set the blend mode to Hard Light. On the top close up layer, apply a Gaussian blur set at 1.00. Drop the opacity down to about 50%
Open the star png from the supplies. Copy and paste it above your close up layers. Change the blend mode to soft light. Drop the opacity down to about 65%.
Using your text tool above the star layer, type out rockstar (or whatever you want really) in a nice fat font. I used Velvenda Cooler with a light color that matches the tube.
Drop the opacity down to about 60% and convert to raster layer. Add a gradient glow using the default setting just moved down to a width of 3.0 and the % at 0 with white.
Using your preset shape tool. Draw a few white stars in the corners of the image. Add noise and drop shadow them if you wish.
Now close off the visibility to the main tube layer and the stars you just created. Merge visible. Uncheck them so you can see everything.
Above your top layer. Add a new layer. Select all, Modify, contract 10, invert. Flood fill that area with your gradient. Add noise. Deselect.
Create another layer above that one. Select all. Modify, contract 5, invert. Flood fill with a solid color from your tube. Deselect.
Now you can add your copyright information and your name.
**Quick Tip: If you work with the same artists over and over. It helps to keep a separate psp file with your copyright information already typed up so that all you have to do is copy and paste.**
When you have your copyright information and name finished, you can close off your bottom layer and merge visible.
Open up the supplied animation in AS. Here comes the fun part!
Go back to PSP and uncheck your bottom layer. Activate that layer and hit copy. Over in AS, paste it and then hit Ctrl+l another 28 times. Select all in that animation. Then go to the music note animation and select all there. Copy that one and paste into the new animation you created.
Go back to PSP and activate your top layer. Copy it. Paste it into AS as a new animation. Hit Ctrl+l 28 times again. Select all and copy and paste into the other animation that you placed the music notes.
Save as a .gif. :D
To make a matching avatar. Open a new image with the dimensions of 150x150. Flood fill with the same gradient as before. Copy and paste your tube. Do the same thing as you did before for the borders except on the bottom border, make three different ones with different noise levels. Add your name/letter and copy right information.
Uncheck two of the noise layers. Copy merged. Paste as new animation in AS. Close off that layer in PSP. Open a different noise layer, copy and paste after the current frame in AS. Repeat for the last noise layer. Save as a .gif in AS.
Hope you enjoyed this tutorial. :D
Friday, August 12, 2011

You Need:
Tube of Choice. I'm using the work of Lorenzo Di Mauro. You can find his art at PTE. Please remember when using his art you need a special license. ;)
Stock image of choice. I found mine at http://www.sxc.hu/
Number Animation. You can download it here. Please do not share. Direct here for the download.
Eye Candy-Glass (any version works)
Font of Choice.
I assume you have working knowledge of Paintshop Pro and Animation shop.
Open a new image with the dimensions 600x275.
Copy and paste your stock image into it. Resize and position it as you wish. Greyscale the image either by using the change to target tool or the hue and saturation option.
Copy and paste your tube over the stock image. You can either leave it the normal color or greyscale it. I greyscaled mine. :)
Above your stock image layer, using the rectangle tool, create a long rectangle with the forground set to black and the background empty. The line should be solid and 10 pixels wide.
Convert to raster layer. Using your deform tool, rotate it so that only the long lines are showing and are diagonal. Between those two lines, using the line tool, create a middle line that is black with dashes. We just made ourselves a little drag strip lol
Convert to raster layer and merge the dashed line with the diagonal lines. Create a new layer. Now activate the drag strip we just made. Using the selections tool, click inside it. Expand by 5.
Go to your layer you just made and flood fill with white. Deselect all. Drag that layer under the lines and drop the opacity down to about 55%.
Create a new layer on top of all of them. Select all, contract by 8, invert and flood fill with black. Deselect all.
If you don't feel comfortable animating, you can stop here and add your copyright information and name. If you are going to animate, then let's continue!
Go over to Animation Shop and open the numbers animation.
Copy the first frame and paste it above the tube layer. Position it where you like. Duplicate it and position if you want a second one ;)
Now, if you did more then one, merge them into one layer. Using your circle tool, with the forground set to black, transparent background, and a line width of 5 pixels, draw circles that fit the size of the number frame. We are making a guide as to where we are going to paste the animation.
Once you are happy, delete the layer with the frame.
On the circle layer using the selection tool, select inside them. Expand by 2 pixels. Create a new layer and apply a glass effect using any eye candy plugin. Deselect.
At this point I would add your name and copyright info. Close off your name, copyright info, the border, and the glass layer. Merge visible with the rest. Open the remaining layers and close off the merged layer. Merge visible on those.
Crop opaque layer.
Now the fun part!
Copy your bottom merged layer and paste as a new animation in AS. Hit Ctrl+L until you have 23 frames. Or you can copy and paste the same layer after current layer until you have 23 frames. Select all frames.
Open your number animation. Select all frames. Copy and paste into your new animation. Position the numbers on those circles you made. If you made more than one, you will have to paste a few times. :)
Now go back to PSP. Copy the top layer, paste as a new animation in AS. Do the same as you did with the first layer until you have 23 frames. Select all and paste into your working animation.
Save as a .gif and enjoy!
I hope you guys enjoyed this tutorial. If you have any questions feel free to email me.
Here is another version I did using the art of Elias Chatzoudis.

Thursday, May 26, 2011

Blue Magic Forum Set
You will need:
Animation of choice. The one I used is my own and can be downloaded here. It is also found in my May Grab Bag. (For those that had issues before, I fixed the link)
Tube of choice. I used the work of Elias Chatzoudis. You need a license to use his work. One can be obtained through Psptubes Emporium.
Filters: Eye Candy 5>Textures
Penta>Jeans
Font of Choice. I used Asuka Caps.
Texture of Choice. You can find the one I used here.
This tutorial was written using Paint Shop Pro 9 and Animation shop. It is understood that you have working knowledge of both programs. It is also understood that this tutorial was written under the influence of Monster energy drinks and Skittles. ♥
Open a new transparent image with the dimensions of 600x215
Open your tube of choice. I'm using the amazing work of Elias Chatzoudis.
Now, open your texture of choice. (seems odd we have stuff open but nothing done yet)
Here we go!
Copy and paste your texture into the blank image. Position and recolor as you wish. You can recolor using the Change to Target brush. Just choose a color and brush over it. You can also use the hue and saturation tool under the adjust menu. Whichever you feel most comfortable using.
Now, copy and paste as a new layer a close up of your tube above the texture layer. Do this a few times and position the tube layers so that they look a bit patterned. Change the blend mode to Soft Light. Play around with the blend modes though. Each texture and tube is different. Here is what I did.

Now. Merge visible layers. Apply Penta Jeans filter with the settings Amount=8 Border=4.
Using your Rectangle Tool, create a border inside the image using a color from the tube. Here is my example.

To make sure it is perfectly centered, go to Objects>Alight>Center in Canvas. Then rasterize the layer.
Now, using Eye Candy 5/Textures, apply Texture Noise. These are the settings I used.

Now, duplicate your textured layer.
Using your Magic Wand Tool, select the inside of your border area we were working with. Expand out 2 px. (Selections>Modify>Expand)
Go back to that duplicated texture layer and invert the selection (Selections>Invert). Now hit delete. Deselect. Using a different color from your tube, recolor that layer.
Now go back to your border layer and add a dropshadow of choice.
Inside that bordered area, using a nice fat font your your choosing, type out the word "Magic" (or whatever fits your tube)
I used Asuka Caps. Now stretch it out so it fits nicely inside it. Rasterize the layer and drop the opacity down to about 40%. Apply Penta Jeans if you wish.
Add drop shadow of choice to the word.
Now. Go back to your tube and copy and paste it as a new layer on top of everything. Position as you wish. With the tube I used, I ended up resizing it about 85% so it fit better, but do what you feel works best for you.
Add a new layer above your tube layer. Select all. Then contract 5px. Invert and flood fill with a color from your tube. Apply the Texture Noise filter we used earlier. Deselect.
At this point you can add your copyright information and name. Add whatever effects you feel work best. I normally just go with a simple gradiant glow. Works best with everything.
Now on to the animation part. If you don't feel comfortable doing this part. Feel free to stop here and just save your image.
Here is where things get a bit tricky, but I will try to make it simple. Close off the bottom textured layers. Both the smaller one we cut out and the bigger background one. Merge visible. Now, close off the layer you just created and reopen the ones you had closed. Merge those together.
Open Animation Shop.
Now open your animation of choice. I'm using one of my own and you can find it in my May Animation Grab bag download. Now check how many frames are in the animation, in our case it's 89. (I know it seems like a lot, but this will get easy, I promise)
Select all frames of the animation (Ctrl+A) and then go to the Animation Menu. You will find an option to cull animation. We are going to do that and remove a frame every 2 frames. This will leave us with 45 frames. A bit easier to work with.
Feel free to delete that first frame if it looks like there isn't anything in it after culling as well. No sense in a blank frame.
Now, back to PSP. Copy your bottom textured layer. Go back to animation shop and paste as a new animation. Now hit Ctrl+L until you have enough frames to match the animation we are using. In our case, 44. Select all frames.
Go back to the animation and select all and then copy. Paste into selected frame with the texture. Now as you can tell we have that colored layer, we are going to try to line the animation up in that area. View the animation to see if you got it the way you want. If you didn't, then feel free to hit the undo button and try it again. If it's your first time it may take a bit to line it up how you want. (heck I've done this a lot and it takes me a bit sometimes)
Now back to psp we go! Close off that texture layer and open up your other layers. Copy merged and then get back to Animation shop. Paste as a new animation. Hit Ctrl+l until we have 44 layers again. And then repeat the process of pasting it into the other animation. (Select all. Copy, paste into selected frames, ect)
If after pasting it you don't like the position of the animation, feel free to backtrack and reposition it. You can always repaste things. That part is rather easy.
Once you are done, optimize however you like your settings to be and save as a .gif.
Now, if you want a matching avatar, this is rather easy.
Create a new image 150x150 (or whatever size you wish it to be) in PSP. Paste your texture and then paste the tube over it. Create a border like we did above that layer. (Selections>Modify>Contract 5px>Invert>flood fill>Deselect)
Now duplicate that layer 3 times. Apply the texture noise filter on each layer, changing the random seed each time.
Copy merged with a different border showing each time in animation shop creating a 3 frame animation. Save as a .gif. Don't forget to add your copyright information!
I hope you enjoyed this tutorial! If you have any questions feel free to email me. :)
Here is another one I did the other night. It uses another animation you can find in the same grab bag ;)


What you will need:
Tubes of Choice. I used the art of Justice Howard. She no longer sells her tubes anywhere. :(
DSB Flux-Bright Noise
AlienSkin Xenofex 2- Electrify
Eyecandy 4000-Corona
Embellishments of choice.
Fonts of Choice.
Open a new canvas that is 450x200. Flood fill the new image with a gradient using 2 colors from your tube. Fill it how you want, I used a linear gradient with no repeats.
Copy and paste the tube you wish to use in the background above the gradient. Position as you desire. Duplicate the layer. Adjust the bottom tube layer to Luminance Legacy. Apply a Guassian Blur to the top layer at 3.00. Adjust the layer to Soft Light. Move the opacity down to about 50%. Fiddle around to see what looks best. :D
Now copy and paste your other tube choice above those layers. Position as you wish and add a drop shadow.
Under the new tube layer, use your Ellipse tool and draw a circle. Make sure the circle can be completly covered by the tube. Duplicate the circle 3 times.
Using Xenofex 2, apply the Electrify filter to the first circle. Mess around with the settings basing them on the style of tube you have and the colors you are using.
On the other circles, apply the same filter just hit random seed a few times. Rename these layers to Animation 1, Animation 2, and Animation 3.
Above your tube layer using the rectangle tool, draw out a long rectangle that spans the entire length of the tag. Convert to raster layer and drop the opacity to about 70%.
Above that rectangle, write out in a nice bold font what you want it to say. I went with "How do you like me now?". Embellish as you wish.
Now add a new layer. On that layer, select all and then contract by 8. Invert and flood fill with your gradient. Deselect all.
Duplicate this layer 3 times. On the first frame layer, add DSB Flux Bright Noise on lighten. Repeat this on the other 2 fram layers, changing the intensity to something different on each layer.
Rename these layers to Frame 1, Frame 2, and Frame 3.
Add your copyright information and your name where you wish on the tag.
Convert your name to a raster layer. Add corona on a lighter color then the font color with all the settings turned down to almost 0.
Now comes the time to animate. :D
Open up animation shop. Go back to PsP and close off animation layers 2 and 3 as well as frame layers 2 and 3. Copy merged.
Head back to animation shop and paste as a new animation.
Back in PsP, close off the animation and frame layer 1 and unhide animation and frame 2 layers. Copy merged and paste in animation shop after the current frame.
Repeat the last step with frame and animation layer 3.
Now make Frame 1 showing again and hide only animation layer 3. (Leaving Animation 1 and 2 showing) Copy merged and paste after current frame.
Make Frame 2 showing and hide only animation layer 2. (Leaving Animation 1 and 3 showing) Copy merged and paste after current frame.
Now make Frame 3 show and leave all animation layers showing.
In Animation shop, select all frames and go to Frame Properties and set it to 15 or 20. Save as a .gif.
I hope you enjoyed this tutorial. Happy creating. :D
Here is another example :D

Subscribe to:
Posts (Atom)
♥ Proud CT ♥

♥Grab my Blinkie♥

♥Places/People♥


