Showing posts with label No Scraps. Show all posts
Showing posts with label No Scraps. Show all posts
Friday, January 6, 2012
 11:23 PM | Posted by
Abstract |
11:23 PM | Posted by
Abstract |

Tube of Choice: I'm using the art of Rene Kunert. You can purchase her art here.
Textures of Choice: I'm using my own textures that you can get from my dA here.
Font of Choice: Champagne & Limousines.
Mask of Choice: I'm using number 16 from here.
Filters: Xero-Radiance.
I assume you have working knowledge of Paintshop Pro.
Open a new image 600x600.
Copy and paste your tube into the new image. Resize if you need to.
Using your Rectangle Tool, set the background to black and your foreground to null, draw a rectangle around your tube. Make sure that it's a bit smaller than your tube itself.
Align it so that it's centered in the image. Convert to a raster layer. Position your tube how you want.
Now, open your texture of choice. If you are using my texture pack, it's Texture2 that I used.
Copy and paste that texture between the tube and rectangle layer. Activate the rectangle layer. Selections>Select All>Float>Defloat>Inverse. Go back to the texture layer and hit delete. Deselect.
Now do the same thing with the tube layer. That way everything is nice and inside the rectangle.
Set the blend mode on the texture layer to Luminance. Merge visible. Duplicate that layer. Set the top layer to Screen and drop the opacity to 75%. If you are using a different color scheme and tube, feel free to mess with the blend modes to see what you like best.
Now, merge visible again. Duplicate your layer again. Close off the top layer. Resize the bottom layer by 75%.
Reopen the top layer. Using your raster deform tool, move the bottom layer to the right of the top layer. Try to center it. Use my tag as a guide. Duplicate the small layer and then hit mirror. Merge down.
Duplicate the bottom layer (the two small ones) and set the blend mode on the top small layer to multiply. Then apply Xero-Radiance on the default setting. Close off the topmost layer and merge visible.
Activate your top layer (the big one) and hit Selections>Select all>Float>Defloat>Modify>Expand by 5 pixels. Create a new layer. Flood fill that layer with a color of choice. In my case I'm going to use white. Deselect and move that layer under your top layer.
Apply noise set at 100% and on Random. Go back to your top layer and merge down. On the bottom layer (the small ones) do the same thing, except only expand by 3.
Now, on the top layer, apply a drop shadow with these settings:
Offset horizontal: 1
Offset Vertical: 1
Opacity: 80%
Blur: 2
Color: Black
Apply it again but change the Offsets to -1, -1. Apply the shadows the same way to the bottom layer.
Crop the image down using the Crop Opaque Merged option. set it to 475x500. Center it so that you have extra space to work with.
Open your texture again. Copy and paste it as a new layer. Make that layer your bottom layer. Apply your maske of choice.
Merge group. Using your Change to Target Brush, greyscale the masked layer. All you need to do is set the color choice to either white or black and just brush over the layer. :)
Drop the opacity of your mask layer down to about 70%.
Activate your top layer. Using your pen tool set to Draw Lines and Polylines, draw out a line set at a width of 5, color of choice, and diamond style. Position the line along the edge of the small tube layer. Use my tag as a reference. Convert to raster layer. Duplicate and hit mirror. Move the line in a bit if you have to.
Merge down and add your shadows like you did before.
Add your copyright information.
Using a font of choice, write out your name. Add the shadows like you did before and save as a .png. Enjoy!
Thursday, May 26, 2011

Blue Magic Forum Set
You will need:
Animation of choice. The one I used is my own and can be downloaded here. It is also found in my May Grab Bag. (For those that had issues before, I fixed the link)
Tube of choice. I used the work of Elias Chatzoudis. You need a license to use his work. One can be obtained through Psptubes Emporium.
Filters: Eye Candy 5>Textures
Penta>Jeans
Font of Choice. I used Asuka Caps.
Texture of Choice. You can find the one I used here.
This tutorial was written using Paint Shop Pro 9 and Animation shop. It is understood that you have working knowledge of both programs. It is also understood that this tutorial was written under the influence of Monster energy drinks and Skittles. ♥
Open a new transparent image with the dimensions of 600x215
Open your tube of choice. I'm using the amazing work of Elias Chatzoudis.
Now, open your texture of choice. (seems odd we have stuff open but nothing done yet)
Here we go!
Copy and paste your texture into the blank image. Position and recolor as you wish. You can recolor using the Change to Target brush. Just choose a color and brush over it. You can also use the hue and saturation tool under the adjust menu. Whichever you feel most comfortable using.
Now, copy and paste as a new layer a close up of your tube above the texture layer. Do this a few times and position the tube layers so that they look a bit patterned. Change the blend mode to Soft Light. Play around with the blend modes though. Each texture and tube is different. Here is what I did.

Now. Merge visible layers. Apply Penta Jeans filter with the settings Amount=8 Border=4.
Using your Rectangle Tool, create a border inside the image using a color from the tube. Here is my example.

To make sure it is perfectly centered, go to Objects>Alight>Center in Canvas. Then rasterize the layer.
Now, using Eye Candy 5/Textures, apply Texture Noise. These are the settings I used.

Now, duplicate your textured layer.
Using your Magic Wand Tool, select the inside of your border area we were working with. Expand out 2 px. (Selections>Modify>Expand)
Go back to that duplicated texture layer and invert the selection (Selections>Invert). Now hit delete. Deselect. Using a different color from your tube, recolor that layer.
Now go back to your border layer and add a dropshadow of choice.
Inside that bordered area, using a nice fat font your your choosing, type out the word "Magic" (or whatever fits your tube)
I used Asuka Caps. Now stretch it out so it fits nicely inside it. Rasterize the layer and drop the opacity down to about 40%. Apply Penta Jeans if you wish.
Add drop shadow of choice to the word.
Now. Go back to your tube and copy and paste it as a new layer on top of everything. Position as you wish. With the tube I used, I ended up resizing it about 85% so it fit better, but do what you feel works best for you.
Add a new layer above your tube layer. Select all. Then contract 5px. Invert and flood fill with a color from your tube. Apply the Texture Noise filter we used earlier. Deselect.
At this point you can add your copyright information and name. Add whatever effects you feel work best. I normally just go with a simple gradiant glow. Works best with everything.
Now on to the animation part. If you don't feel comfortable doing this part. Feel free to stop here and just save your image.
Here is where things get a bit tricky, but I will try to make it simple. Close off the bottom textured layers. Both the smaller one we cut out and the bigger background one. Merge visible. Now, close off the layer you just created and reopen the ones you had closed. Merge those together.
Open Animation Shop.
Now open your animation of choice. I'm using one of my own and you can find it in my May Animation Grab bag download. Now check how many frames are in the animation, in our case it's 89. (I know it seems like a lot, but this will get easy, I promise)
Select all frames of the animation (Ctrl+A) and then go to the Animation Menu. You will find an option to cull animation. We are going to do that and remove a frame every 2 frames. This will leave us with 45 frames. A bit easier to work with.
Feel free to delete that first frame if it looks like there isn't anything in it after culling as well. No sense in a blank frame.
Now, back to PSP. Copy your bottom textured layer. Go back to animation shop and paste as a new animation. Now hit Ctrl+L until you have enough frames to match the animation we are using. In our case, 44. Select all frames.
Go back to the animation and select all and then copy. Paste into selected frame with the texture. Now as you can tell we have that colored layer, we are going to try to line the animation up in that area. View the animation to see if you got it the way you want. If you didn't, then feel free to hit the undo button and try it again. If it's your first time it may take a bit to line it up how you want. (heck I've done this a lot and it takes me a bit sometimes)
Now back to psp we go! Close off that texture layer and open up your other layers. Copy merged and then get back to Animation shop. Paste as a new animation. Hit Ctrl+l until we have 44 layers again. And then repeat the process of pasting it into the other animation. (Select all. Copy, paste into selected frames, ect)
If after pasting it you don't like the position of the animation, feel free to backtrack and reposition it. You can always repaste things. That part is rather easy.
Once you are done, optimize however you like your settings to be and save as a .gif.
Now, if you want a matching avatar, this is rather easy.
Create a new image 150x150 (or whatever size you wish it to be) in PSP. Paste your texture and then paste the tube over it. Create a border like we did above that layer. (Selections>Modify>Contract 5px>Invert>flood fill>Deselect)
Now duplicate that layer 3 times. Apply the texture noise filter on each layer, changing the random seed each time.
Copy merged with a different border showing each time in animation shop creating a 3 frame animation. Save as a .gif. Don't forget to add your copyright information!
I hope you enjoyed this tutorial! If you have any questions feel free to email me. :)
Here is another one I did the other night. It uses another animation you can find in the same grab bag ;)


What you will need:
Tubes of Choice. I used the art of Justice Howard. She no longer sells her tubes anywhere. :(
DSB Flux-Bright Noise
AlienSkin Xenofex 2- Electrify
Eyecandy 4000-Corona
Embellishments of choice.
Fonts of Choice.
Open a new canvas that is 450x200. Flood fill the new image with a gradient using 2 colors from your tube. Fill it how you want, I used a linear gradient with no repeats.
Copy and paste the tube you wish to use in the background above the gradient. Position as you desire. Duplicate the layer. Adjust the bottom tube layer to Luminance Legacy. Apply a Guassian Blur to the top layer at 3.00. Adjust the layer to Soft Light. Move the opacity down to about 50%. Fiddle around to see what looks best. :D
Now copy and paste your other tube choice above those layers. Position as you wish and add a drop shadow.
Under the new tube layer, use your Ellipse tool and draw a circle. Make sure the circle can be completly covered by the tube. Duplicate the circle 3 times.
Using Xenofex 2, apply the Electrify filter to the first circle. Mess around with the settings basing them on the style of tube you have and the colors you are using.
On the other circles, apply the same filter just hit random seed a few times. Rename these layers to Animation 1, Animation 2, and Animation 3.
Above your tube layer using the rectangle tool, draw out a long rectangle that spans the entire length of the tag. Convert to raster layer and drop the opacity to about 70%.
Above that rectangle, write out in a nice bold font what you want it to say. I went with "How do you like me now?". Embellish as you wish.
Now add a new layer. On that layer, select all and then contract by 8. Invert and flood fill with your gradient. Deselect all.
Duplicate this layer 3 times. On the first frame layer, add DSB Flux Bright Noise on lighten. Repeat this on the other 2 fram layers, changing the intensity to something different on each layer.
Rename these layers to Frame 1, Frame 2, and Frame 3.
Add your copyright information and your name where you wish on the tag.
Convert your name to a raster layer. Add corona on a lighter color then the font color with all the settings turned down to almost 0.
Now comes the time to animate. :D
Open up animation shop. Go back to PsP and close off animation layers 2 and 3 as well as frame layers 2 and 3. Copy merged.
Head back to animation shop and paste as a new animation.
Back in PsP, close off the animation and frame layer 1 and unhide animation and frame 2 layers. Copy merged and paste in animation shop after the current frame.
Repeat the last step with frame and animation layer 3.
Now make Frame 1 showing again and hide only animation layer 3. (Leaving Animation 1 and 2 showing) Copy merged and paste after current frame.
Make Frame 2 showing and hide only animation layer 2. (Leaving Animation 1 and 3 showing) Copy merged and paste after current frame.
Now make Frame 3 show and leave all animation layers showing.
In Animation shop, select all frames and go to Frame Properties and set it to 15 or 20. Save as a .gif.
I hope you enjoyed this tutorial. Happy creating. :D
Here is another example :D


This tutorial was written for those with working knowledge of PaintShop Pro.
Supplies Needed:
PaintShop Pro 9 (any other version should work)
Tube of Choice with close up
I used the artwork of Elias Chatzoudis. If you wish to use his tubes you need to purchase them from here.
Elias Stalker Template
Heart Mask 2
(Both by me)
Font of choice. I am using LD Jilly Nilly
Filters Used
Eye Candy 4000-Gradient Glow/Weave
Penta-Dot Cross/Jeans
Eye Candy 5 Impact-Glass (You could also use the glass setting on Eye Candy 4000)
Ok lets get started. :)
Open the template. Duplicate it and close the original.
Delete the copyright layer.
Select the pink rectangles layer. Go to "Selections".
Select all. Then float and defloat the layer.
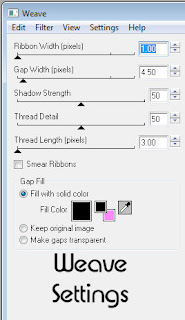
Go to Eye Candy 4000 and apply the Weave filter using the following settings.
Open up your close up of the tube. Copy and paste it into a new layer above the rectangles.
Position and then go to "selections" and hit invert. Hit delete on your keyboard.
Change the blend mode of the tube to "Luminence(Legacy)"
Deselect all.
Select the rectangle layer again. Add a drop shadow of choice. I used mine with the settings of 4,2, 45, 7.00.
Select the black bars layer now. Go to selections. Select all, float/defloat again.
Now take a color from your tube and black. Make a foreground to background gradient with the following settings.
Linear
Angle: 325
Repeats:5
Invert checked
Fill the black bars with the gradient.
Go to "Adjust" and hit blur. Use a Gaussian Blur set to 20.00.
Now use Penta's Dot and Cross filter with the settings 63, 19, 0.
Add drop shadow of choice. Deselect all.
Select the grey heart layer. Go to selections. Select all, float/defloat again.
Fill with black.
Apply Penta Dot and Cross with the same settings as before.
Then apply Eye Candy 4000 Weave with the same settings.
**It should be automatically the same as last used**
Deselect all.
Now move the word art layers down on the tag. Feel free to use my tag as a guide as to where they go.
Open your tube up. Copy and paste it as a new layer above the word art. Position. (Use my tag as a guide)
Add drop shadow of choice.
Now select the little hearts layer. Go to selections. Select all, float/defloat again.
Fill with the tube color you used in the gradient. Go to "Adjust" and hit add noise. I had it set on Uniform/50%/Monochrome checked.
Drop shadow if you wish.
Select the black letters layer. Go to selections. Select all, float/defloat.
Now make a new layer above that one.
Apply Eye Candy 5 Impact Glass on the default settings using the color from the tube.
Activate the black letters layer again. Apply Penta Jeans set to 23,10.
Deselect.
Add drop shadow to the glittered words layer if you wish.
Now make a new layer and put it at the bottom of all of the current layers.
Fill with the fore/back gradient.
Apply the Heart Mask. Merge group.
Now using the font of choice, type out your name in black. Position using my tag as a guide. Convert to raster layer.
Apply Eye Candy Gradient Glow. Have it on Fat with the width set at 3.0 and soft corners 0%
Drop shadow if you wish.
Add artist information and copyright.
Save as a .png. :)
Hope you enjoyed my tutorial. ^^
Supplies Needed:
PaintShop Pro 9 (any other version should work)
Tube of Choice with close up
I used the artwork of Elias Chatzoudis. If you wish to use his tubes you need to purchase them from here.
Elias Stalker Template
Heart Mask 2
(Both by me)
Font of choice. I am using LD Jilly Nilly
Filters Used
Eye Candy 4000-Gradient Glow/Weave
Penta-Dot Cross/Jeans
Eye Candy 5 Impact-Glass (You could also use the glass setting on Eye Candy 4000)
Ok lets get started. :)
Open the template. Duplicate it and close the original.
Delete the copyright layer.
Select the pink rectangles layer. Go to "Selections".
Select all. Then float and defloat the layer.
Go to Eye Candy 4000 and apply the Weave filter using the following settings.

Open up your close up of the tube. Copy and paste it into a new layer above the rectangles.
Position and then go to "selections" and hit invert. Hit delete on your keyboard.
Change the blend mode of the tube to "Luminence(Legacy)"
Deselect all.
Select the rectangle layer again. Add a drop shadow of choice. I used mine with the settings of 4,2, 45, 7.00.
Select the black bars layer now. Go to selections. Select all, float/defloat again.
Now take a color from your tube and black. Make a foreground to background gradient with the following settings.
Linear
Angle: 325
Repeats:5
Invert checked
Fill the black bars with the gradient.
Go to "Adjust" and hit blur. Use a Gaussian Blur set to 20.00.
Now use Penta's Dot and Cross filter with the settings 63, 19, 0.
Add drop shadow of choice. Deselect all.
Select the grey heart layer. Go to selections. Select all, float/defloat again.
Fill with black.
Apply Penta Dot and Cross with the same settings as before.
Then apply Eye Candy 4000 Weave with the same settings.
**It should be automatically the same as last used**
Deselect all.
Now move the word art layers down on the tag. Feel free to use my tag as a guide as to where they go.
Open your tube up. Copy and paste it as a new layer above the word art. Position. (Use my tag as a guide)
Add drop shadow of choice.
Now select the little hearts layer. Go to selections. Select all, float/defloat again.
Fill with the tube color you used in the gradient. Go to "Adjust" and hit add noise. I had it set on Uniform/50%/Monochrome checked.
Drop shadow if you wish.
Select the black letters layer. Go to selections. Select all, float/defloat.
Now make a new layer above that one.
Apply Eye Candy 5 Impact Glass on the default settings using the color from the tube.
Activate the black letters layer again. Apply Penta Jeans set to 23,10.
Deselect.
Add drop shadow to the glittered words layer if you wish.
Now make a new layer and put it at the bottom of all of the current layers.
Fill with the fore/back gradient.
Apply the Heart Mask. Merge group.
Now using the font of choice, type out your name in black. Position using my tag as a guide. Convert to raster layer.
Apply Eye Candy Gradient Glow. Have it on Fat with the width set at 3.0 and soft corners 0%
Drop shadow if you wish.
Add artist information and copyright.
Save as a .png. :)
Hope you enjoyed my tutorial. ^^
Subscribe to:
Posts (Atom)
♥ Proud CT ♥

♥Grab my Blinkie♥

♥Places/People♥


