Monday, January 30, 2012
 9:49 AM | Posted by
Abstract |
9:49 AM | Posted by
Abstract |
This tutorial was inspired by the song "For the Love" by Blue October. Feel free to listen to it while you play. :)

What you need:
Tube of Choice. I'm using the art of Barbara Jensen. You can find her art here.
Kit of Choice. I'm using Sterling. It's a Free To Use kit and can be found here.
Animation. I'm using number 25 from Simone. It can be found here.
WordArt. Right click and save this image here. It's a .png word art.

I assume you have a working knowledge of Paintshop Pro and Animation Shop.
Open a new image, 600x225 with a transparent background.
Copy and paste your tube into the new image, resize if needed.
Open your paper of choice. I'm using Paper7. Copy and paste it below your tube layer. Position it how you like, just make sure the entire background is filled.
Open your frame of choice from the kit. I'm using Frame 2. Copy and paste it into your image. Move it under your tube layer and position it so that it's behind the tube. We aren't going to use this as a "frame". Just some decoration.
Now find a flower you like. I am going to use the Flower Pin. Copy and paste that above your frame. Resize if you need to. Then move it down so that half of it isn't showing. We only want a few petals showing. Duplicate this image and mirror it.
Open a heart element. I'm using the white heart (Pearl Heart). Copy and paste it above your frame layer. Free rotate to the left by 45 degrees. Duplicate that heart and mirror it.
Create a new layer at the top of your image. Select all>Contract by 8>Invert. Flood fill with a grey or black. Drop the opacity to 80%. Add a gradient glow to it. If you don't have Eye Candy, use a drop shadow.
Open the wordart I have provided (or feel free to make your own) and copy and paste it above the background layer. Position it to the left or right of the tube. Duplicate that layer and drag it to the other side. Depending on the background you picked, either the white or black words will show.
Here comes the fun part!
Close off your background and word art layers. Merge visible. Now, close off your top layer, merge visible. Add your copyright information to the top, as well as your name. Merge those down to the first layer.
If you are not going to animate, save now.
In Animation shop, open the animation you have picked. I am using Simone's Animation 25. Cull this animation by removing 1 frame every 2 frames. You should be left with 30 frames. Crop around the animation. so that you don't have a massive image. Delete the first two frames. Minimize this animation. Go back to PSP.
In PSP, close off the top layer and copy merged. Paste into Animation Shop as a new animation. Hit Ctrl+L until you have 28 frames. If you look in the bottom right of the program, it will tell you how many frames you have.
Select all frames. Go back to Simones Animation. Select all frames. Copy and then paste into the other image by Pasting into current frame. Position it above the left wordart. Where the white wordart part is at the top. View animation. If you don't like it, hit undo and repeat until it's where you like it.
Go back to PSP. Close off the bottom layer and open the top layer. Copy merged and paste into Animation Shop as a new animation. Hit Ctrl+L until you have 28 frames.
Select all frames. Copy and paste into selected frame in your working image. (The one you just pasted the animation into)
View Animation. If it looks good, optimize and save as a .gif.
Enjoy!
To make an avatar to match: Create a new image in PSP with the dimensions of 150x150. Copy the bottom layer of your banner into the new image. Copy and paste your tube above it. Create the border like we did before. Add your name or initial and copyright information. Save as .jpg. You can animate it if you wish. I prefer not to.
Sunday, January 29, 2012

What you need:
Tube of Choice. I'm using the tube Precious by Rene Kunert. You can find her art here.
Filters: DSB-Radical Mosaic, Xero-Porcelin, Penta-Color Dot, Twist (default filter), Pixelate (default filter), and Eye Candy Gradient Glow (optional)
I assume you have working knowledge of PSP. This tutorial was written in Paintshop Pro 9.
Open a new image 600x600 (transparent)
Open your tube and paste into your new image.
Using your ellipse tool set to circle, draw out a mid sized circle in the middle of the image with the background set to white and the foreground set to null.
Convert to raster layer and position so that it is covering part of the tube that you'd like to showcase.
Selections>Float>Defloat>Invert Activate your tube layer and hit delete. Deselect all. Move the tube layer above your circle.
Duplicate your tube. On the top layer, using the Change to Target tool, color that layer with a color of your choice. Set the blend mode of that layer to Multiply.
Apply Xero-Porcelin on default settings to that layer. Merge visible. Resize your circle by 85%. Close off that layer.
Copy your tube back on the image again. Repeat the above steps, this time focus on another part of the tube.
Open both of your layers. Position them so that they are sort of overlapping each other. Merge them into one layer. Duplicate that layer twice. Bring the duplicated layers to the bottom. Rotate and flip them around in whatever way looks best. Merge the duplicated layers together.
Apply DSB-Radical Mosaic to the bottom layer. Apply Gaussian Blur set to 10%. Apply Twirl at max settings. Now apply Pixelate set to 22/22.
Drop the opacity on that layer down to 80%. On your top layer, add a gradient glow using a darker version of the color you picked.
Resize the bottom layer by 80%. Copy merged opaque.
Using a nice fat font set to white background, type out something. I used the word Beauty. Drop the opacity to 40% and apply a drop shadow with these settings:
Vert: 1
Horizontal: 3
Opacity: 60%
Blur: 5
Color: Black
Apply that drop shadow to your main tube layer. Apply it again, just changing the Vert/Horizontal to -1 and -3.
Create a new layer and flood fill that with white. Move that to the bottom. Duplicate your twisted layer three times so you have four of them.
Close off the top two, on the bottom, add Penta-Color Dot with the Value set at 100 and the distance set at 5. Leave the other settings alone.
Close off that layer, and go to the one above it. Apply Color Dot but this time change the distance to 7.
Now close off that layer, on the next one above it, apply Color Dot and change the distance to 9. Do it once more for last layer like that, just change the distance to 11.
Add your copyright information and name. If you are not going to animate, save now.
Now, make sure your copied layers are all closed off except the bottom one. Copy merged and paste into a new animation in Animation Shop.
Go back to PSP and close off that layer and open the one above it. Paste into Animation Shop after current frame. Do this until you have all the copied layers done. (These should be the twisted ones)
Once you have 4 frames in animation shop, highlight the first 3 frames. Copy and paste those as a new animation. Select all frames in that animation, Reverse frames.
While those frames are all still selected, copy them. Go back to your first animation. Activate the last frame and then paste after current frame. You should now have 7 frames. Select all frames, set the frame properties to 8.
Optimize and save as a .gif. Enjoy!
Friday, January 20, 2012

You need:
Tube of choice. I'm using the art of Barbara Jensen. You can purchase her art here.
Kit of choice. I'm using the kit Love Light by giZZy. You can purchase the kit here.
Mask of choice. I'm using Jenny's Sparkle Mask. You can find it here.
I assume you have working knowledge of Paintshop Pro.
Open a new image 600x600
Open element 17, or any of the other frames in the kit. Copy and paste into your image as a new layer. Resize by 85%
Copy and paste your tube of choice above the frame layer. Resize as much as you need to. I did my tube by 85%
Activate your frame layer. Using your magic wand tool, click in the middle of the frame. Activate your tube layer, invert and use your eraser tool to erase just the bottom of the tube.
Deselect. Open a paper of your choice. I'm using Paper 1. Copy and paste as a new layer under your frame.
Activate your frame layer again, using your magic wand tool, click in the middle. Expand by 5. Go back to your paper layer. Invert and hit delete.
Open Element 41, copy and paste above your tube layer.Resize by 50% and position at the bottom of the tube. Use my tag as a guide if you need to.
Open Element 4. Copy and paste under the tube layer. Resize by 70%. Position it to the left of the tube so that some of it is just hiding under the tube.
Duplicate that layer, mirror the duplicate.
Open element 35. Copy and paste so that it is the bottom layer. Resize by 50%. Position it towards the bottom on either the left or right side. Duplicate and hit mirror.
Now, open the glitter page number 9. Copy and paste it under your roses. Apply mask of choice. Merge group and resize by 90%
Open element 14, copy and paste above your mask. Resize by 50%. Recolor red. Move to one side of the frame. Duplicate and move the duplicate to the other side of the frame.
Crop merged opaque. Open Element 31. Copy and paste under your tube layer. Resize by 50% and position so that it's coming out from behind the tube. Duplicate and mirror. Merge those layers together.
Open Element 49. Copy and paste under your tube. Resize by 50%, duplicate and mirror. Moved the mirrored one down a bit.
Open Element 16. Copy and paste as the top layer. Resize by 80%. Position it so that it looks like it's perched on the heart.
Add your name and copyright information. Save as a .ping. Enjoy!
Tuesday, January 17, 2012

You need:
Tube of Choice. I'm using the work of Barbara Jensen. You can purchase her art here.
Scrap kit of Choice. I'm using Wedding Bells by giZZy. You can purchase the kit here.
Font of Choice. I'm using Sweetly Broken. You can download it here.
I assume you have working knowledge of Paintshop Pro.
Open your tube. Before we get started, if you are using the same tube as I am, we need to recolor the clothing to match.
First off, find the orange clothing layers. Activate the layers. Now change the blend mode to luminosity. Tada!
Now, open a new image with the dimensions of 600x600. Copy merged on your tube and paste into the new image.
Resize by 85%.
In your scrap kit, find the frame element. It should be Element29. Copy and paste into your working image. Resize by 70%.
Using your free rotate tool, rotate to the right 45 degrees. Resize again by 90%. Adjust>Sharpeness>Sharpen. Just once will be fine.
Move your frame layer under your tube layer. Position your tube so that it's sitting just above the bottom corner of the frame. Go back to your frame layer.
Selections>Select All>Float>Defloat. Now, go back to your tube layer and with the eraser tool, erase the bottom part of the tube.
Deselect.
Now find a paper you like, I'm using Paper 3. Copy and paste into your image as a new layer. Move that layer under the frame layer. Resize your paper by 75%.
Reactivate your frame layer. Using your magic wand with the tolerence set to 10, click inside the frame. Modify>Expand by 5. Invert and go back to your paper layer and hit delete. Deselect.
Using your crop tool. Crop merged opaque 600x600.
Open the heart with the music staff on it, Element 42, copy and paste into the working image. Resize by 30%. Move it above the frame layer. Mirror it and position it towards the bottom of the frame, just behind the tube.
Open element 11 (the glasses) and do the same thing you did for the heart layer. This time, instead of hitting mirror, leave it be. Move it above the tube layer and position it at the bottom.
Open Element 25. Copy and paste it under the heart layer.Resize by 50%. Position it so that it looks like it's coming out of the heart. Using your change to target brush, color the top flower layer a color from your tube.
Open Element 43. Copy and paste it under the bottom flower layer. Resize by 50%. Position it towards the top of the frame, but so that the bottom part is hidden. Recolor it the same way we did the flower.
Open Element 39. Copy and Paste it into the new image. Move it so that it's the bottom layer.Resize by 75%. Duplicate that layer and set the top layer to Multiply.
On your frame layer, apply a drop shadow with the following settings:
Vertical: 2
Horizontal:2
Opacity: 66%
Blur:8.7
Apply it again, but change the horizontal and verical to -2.
Do this for your tube layer as well.
Crop merged opaque.
Using your text tool, type out your name in white using the font Sweetly Broken. Have it set to 100px and using the text tool, rotate it a bit.
Rasterize the text layer and add a drop shadow with the following settings:
Vertical: 2
Horizontal:2
Opacity: 60%
Blur:2
Apply it again but change the Vertical and Horizontal to -2.
Add your copyright information and save as a .png. Enjoy!
Friday, January 6, 2012

Tube of Choice: I'm using the art of Rene Kunert. You can purchase her art here.
Textures of Choice: I'm using my own textures that you can get from my dA here.
Font of Choice: Champagne & Limousines.
Mask of Choice: I'm using number 16 from here.
Filters: Xero-Radiance.
I assume you have working knowledge of Paintshop Pro.
Open a new image 600x600.
Copy and paste your tube into the new image. Resize if you need to.
Using your Rectangle Tool, set the background to black and your foreground to null, draw a rectangle around your tube. Make sure that it's a bit smaller than your tube itself.
Align it so that it's centered in the image. Convert to a raster layer. Position your tube how you want.
Now, open your texture of choice. If you are using my texture pack, it's Texture2 that I used.
Copy and paste that texture between the tube and rectangle layer. Activate the rectangle layer. Selections>Select All>Float>Defloat>Inverse. Go back to the texture layer and hit delete. Deselect.
Now do the same thing with the tube layer. That way everything is nice and inside the rectangle.
Set the blend mode on the texture layer to Luminance. Merge visible. Duplicate that layer. Set the top layer to Screen and drop the opacity to 75%. If you are using a different color scheme and tube, feel free to mess with the blend modes to see what you like best.
Now, merge visible again. Duplicate your layer again. Close off the top layer. Resize the bottom layer by 75%.
Reopen the top layer. Using your raster deform tool, move the bottom layer to the right of the top layer. Try to center it. Use my tag as a guide. Duplicate the small layer and then hit mirror. Merge down.
Duplicate the bottom layer (the two small ones) and set the blend mode on the top small layer to multiply. Then apply Xero-Radiance on the default setting. Close off the topmost layer and merge visible.
Activate your top layer (the big one) and hit Selections>Select all>Float>Defloat>Modify>Expand by 5 pixels. Create a new layer. Flood fill that layer with a color of choice. In my case I'm going to use white. Deselect and move that layer under your top layer.
Apply noise set at 100% and on Random. Go back to your top layer and merge down. On the bottom layer (the small ones) do the same thing, except only expand by 3.
Now, on the top layer, apply a drop shadow with these settings:
Offset horizontal: 1
Offset Vertical: 1
Opacity: 80%
Blur: 2
Color: Black
Apply it again but change the Offsets to -1, -1. Apply the shadows the same way to the bottom layer.
Crop the image down using the Crop Opaque Merged option. set it to 475x500. Center it so that you have extra space to work with.
Open your texture again. Copy and paste it as a new layer. Make that layer your bottom layer. Apply your maske of choice.
Merge group. Using your Change to Target Brush, greyscale the masked layer. All you need to do is set the color choice to either white or black and just brush over the layer. :)
Drop the opacity of your mask layer down to about 70%.
Activate your top layer. Using your pen tool set to Draw Lines and Polylines, draw out a line set at a width of 5, color of choice, and diamond style. Position the line along the edge of the small tube layer. Use my tag as a reference. Convert to raster layer. Duplicate and hit mirror. Move the line in a bit if you have to.
Merge down and add your shadows like you did before.
Add your copyright information.
Using a font of choice, write out your name. Add the shadows like you did before and save as a .png. Enjoy!
Friday, December 23, 2011

You need:
Tube of choice. I'm using the work of Neoracer. You can purchase a license to use his work here.
Background of choice. I'm using a background pack by Abstract Creations (me!) that can be purchased here.
Animation of choice. I'm using this one here. It's my personal creation and I ask that you direct people here to get it.
Kit of choice. I'm using a FTU kit by Kristin. It can be found here.
Fonts: Wintermute.
I assume you have working knowledge of Paintshop Pro and Animation Shop. This tut can be recreated in photoshop if needed.
Open a new image 600x225
Open the fractal pack (or texture of choice) and choose one that you like the most. I'm using the Infinity image.
Desaturate or color using the target tool to match your tube. What I do to desaturate is set my foreground to black or white and use the change to target tool to color it.
I'm making my tag black and white but you can do whatever color you want.
Copy and paste your tube as a new layer. Position how you want. Desaturate the tube.
Open your scrap kit of choice. I'm using a freebie from Kristin that can be found on the Creative Misfits Blog.
If you aren't using the same kit, then feel free to improvise during the next few steps using elements from your kit.
Open Flower1. Copy and paste it into your tag. Resize by 75% and move to the corner of the tag. Duplicate this flower, mirror it and move it to the other corner. I rotated the second one a bit so it wasn't exactly the same. You don't have to do that.
Now open the Flame element.Copy and paste it under your flowers. Move it over to the right or left, your choice. Resize by 75% and position it right at the edge. Use mine as an example.
Open the Doodle element. Copy and paste it above your flame layer. Resize by 75% and position it so that it's just above the flame layer on the side.
Merge the doodle and flame layer together. Duplicate your merged layer and hit mirror. Position a bit lower then the other layer is. Use mine as a guide.
Open the Glitter Trail element. Paste it just above your tube. Move it down to the bottom of the tag.
Activate your top layer. Now add a new raster layer. Select all, modify and contract by 8. Paste your background layer into the image. Hit delete. Deselect.
Crop merged opaque. Now make sure your new border layer is desaturated. Mirror the layer. Apply texture effects-MosaicGlass on these settings:
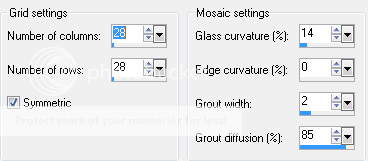
Now move that layer to just above your background. Go back to your top layer and add a new raster layer.
Select all>Modify>contract by 5. Invert and flood fill with a color of your choice. Deselect. Apply noise. I had mine set to 100% and random.
Add your copyright info and name. If you are not going to animate, save as a .jpg and enjoy!
If you are going to animate then let's get to work.
Close off your bottom layer. (your background layer) Merge visible.
Open your bottom layer and close off your top layer.
In Animation Shop, open the animation with MNG in the name. If you animate in Photoshop, I have included the psd file as well.
Minimize that animation and go back to PSP. Copy merged. Paste into animation shop as a new animation. Hit Ctrl+L 3 times. Make sure you only have 4 frames.
Go back to your first animation in Animation shop (the one I provided). Resize so that it is 250x250. Select all Frames. Copy.
In your background animation, select all and paste into current layer. Paste again and move the animation someplace else on the background.
Go back to PSP. Close off the bottom layer and open the top layer. Copy merged.
In animation shop, paste as a new animation. Hit Ctrl+L 3 times. Make sure you have 4 frames. Select all frames. Copy and paste into current layer on the background animation. This is the one we just put the other animation into.
Set your frame properties to 20. Save as a .gif and enjoy!
Wednesday, December 7, 2011

You need:
Tube of choice. I'm using the work of Robert Alvarado. You can find his art at PTE.
Mask of choice. I'm using one from the wonderful Vix. I used Mask 08 from her Mask Set 2. You can find it here.
Fonts of choice. I used Rollergirls and Oh La La.
Filters: Mura's Meister Copies and Eye Candy Corona. You can do this tut without either, but you will have to duplicate by hand.
Texture of choice. I'm using one of mine. You can get it on my other blog here.
This tutorial was written in PSP9 and Animation shop. I assume you have working knowledge of both programs.
Open a new image that is 575x575. Flood fill with white (or a background color that matches any forums you are on)
Copy and paste the texture into the new image. Apply your mask of choice.
Merge group. Rename that layer to "Spin1". Under the adjust menu, hit One Step Photofix.
Duplicate that layer 3 more times so you have a total of 4. Make sure you name them Spin2-4. Close 3 of them off. Leave one open as a reference.
Now, copy and paste your tube over those layers. Position it where you wish.
Using your Rectangle tool, create a bar under your tube layer. Set the forground to null and background to a color from your tube.
Convert to raster layer and apply Muras Copies using these settings:

Open a close up from your tube and copy and paste it over your bars. If you don't have a close up, use your tube and just do it a few times to fill the bars. Make sure you merge all those tube layers together. :)
Go back to your bar layer. Selections>Select all>Float>Defloat. Now modify and contract by 4. Hit invert and then on your close up layer, hit delete.
Set your close up layer to Screen.
Now duplicate your bar layer. Selections>Select all>Float>Defloat. Modify and contract that one by 2. Invert it and hit delete on that layer.
On your original bar layer, apply noise set to Random and 75%. Make sure the Monochrome box is checked. Close off all the layers except the close up layer and the bars. Merge visible.
Using a pixel font (use whatever you like best) write out a saying that fits your tube. Position this between the bars you made. Make sure they are behind the tube layer.
If you want to put a dot between each phrase, use Ctrl+7.
Line it up how you feel it looks best. Duplicate that layer and move it down to between the other bars. You should have a row of text in each blank space between the bars. Reference my tag if needed.
Merge your pixel layers into one. Apply Eye Candy-Corona, making sure the Glow Width is down to 5. Use any color you feel looks good. I did white.
Now above your main tube, using your font tool, write out a word or saying that fits. Use any color or font you want. I used Rollergirls.
Convert to raster. Duplicate that layer. Using your free rotate tool, rotate one layer 90 degrees to the right. Rotate the other one 90 degrees to the left. Position them so that they are on the sides of the bars.
Merge the text layers together. On that merged text layer: Selections>Select all>float>defloat. Modify and contract by 4. Add a new raster layer. Flood fill that new layer using a lighter color. Select none.
On the bottom text layer, apply noise on the same settings as before.
Add your copyright info and your name. If you want your name to match the other text, just do the same thing you did before. Just don't contract by as much. :)
If you are not going to animate, close off the white layer at the bottom and merge cropped opaque. Save as a png.
If you are going to animate:
Close off all the Spin layers and the white background. Merge visible.
Activate the Spin1 layer. Make sure it's open. Rotate to the left by 90 degrees.
On the Spin2 layer, rotate to the left by 180 degrees. On spin3, rotate to the left by 270 degrees. Leave the Spin4 layer alone.
Open all 4 spin layers. Close off the white layer. Merge cropped opaque. Reopen the white layer at the bottom and close off the spin layers 2-4. Make sure spin 1 is open.
Copy merged. Paste into Animation shop as a new animation.
Go back to PSP and close off spin1. Open spin2 and copy merged. Paste into AS after current frame. Repeat this for spin3 and spin4.
Set the frame properties to 25. Optimize and save as a .gif. Enjoy!
Subscribe to:
Posts (Atom)
♥ Proud CT ♥

♥Grab my Blinkie♥

♥Places/People♥


