Friday, October 14, 2011

Supplies:
Tube of Choice. I am using the work of Fetch Art. You can get this tube at ScrapsNCrap. Please do not use it unless you have the proper license to do so.
Template by Missy. We will be using the one labeled finishthistagweek23. You can find them here.
Filters: Xero-Fritillary, Xero-Radiance, and Penta-Jeans Eye Candy-Gradient Glow (optional)
Font: Little Sparrow. You can find that here.
My supplies. You can find them here.
First of all. Turn on some good tunes. It always helps with the mojo. ;)
Open template. Expand canvas size to 900x550. This is only temporary. So don't worry!
Open your tube of choice and paste above the top layer. If you are using a bigger tube (PFD/SnC/BarbJensen) feel free to resize to a working size. Position it where you like.
Now using your crop tool on crop opaque. Drag it to a easier working size for you. Hit ok.
Now, pick a color from your tube. Click the lock transparency button for the square one layer. Activate that layer and flood fill with that color. Repeat for the square two.
Apply Xero-Fritillary on these settings:

Now activate circle 1. Apply Penta-Jeans on the default setting. Do the same for circle 3. If you are working with a lighter tube, feel free to change the color of those circles to something lighter before applying the filter.
Activate circle 2. Flood fill with a lighter color from your tube. Apply the jeans filter as you did before.
Activate the frame back layer. Flood fill with your darker color.
Activate your frame back 2 layer. Flood fill with your lighter color. Repeat for frame back 3 layer.
With either frame back 2 or 3 activated, post your tube over that layer. If you aren't working with a big tube, use a close up. Position within the frame. If you need to resize, go ahead.
Reactivate the frame back layer. Select all. Float>defloat>invert. Activate tube layer and hit delete. Deselect all.
Repeat this for the other frame back layer, just mirror your tube the other direction.
You are going to do this next step for both of those tube layers, so start with either again.
Activate one of them. Duplicate it. On the bottom one (the original) set the blend mode to luminance. On the top one set it to multiply. Also apply Xero-Radiance on the default setting to that top one. Repeat for the other tube close up layer.
Now, on the original frame back layer (the one with the darker color) apply Xero-Fritillary using the same settings as before.
Activate the brush layer. Using the change to target brush, color it either of your colors of choice.
Using the font Little Sparrow set to 100 type out some wording that fits your tag. Convert to raster layer. Add noise set to 50% and on hard. Apply Eye Candy-Gradient Glow in a color that fits your tag (either black or white). Drag it just under you main tube layer.
Position your elements how you wish. I'm not going to tell you how. You can use my tag as a guide though. You can use what is supplied or your own.
Add drop shadows as you wish. Crop merged opaque.
Add your copyright information and your name.
Save as a png and enjoy!
Monday, October 3, 2011
Please understand this is an older tut from my other blog. :)

To see the full size version of the tag you can go here.
Supplies:
Tube of choice W/Close up-I'm using the art of Elias Chatzoudis. You need a license to use his art. You can purchase that here.
Supplies-You can download them here. Please do NOT redistribute these at all or use them in any tutorials without my permission.
Fonts: Velvenda Cooler
You also need working knowledge of Paintshop Pro and Animation Shop.
Open your tube and minimize it in the program. Unzip your supplies.
Create a new image with the dimensions of 600x275 with a 72dpi (per license companies TOU)
Copy and paste your tube as a new layer into your new document.
Create a gradient using colors from your tube. I used a Radial gradiant with the settings like such: 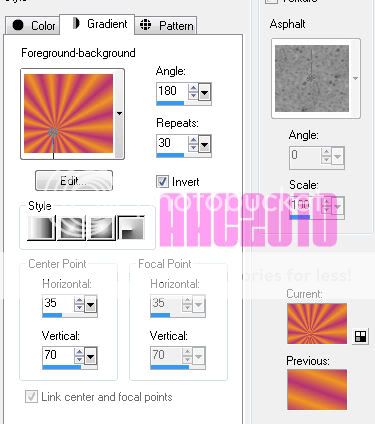
You can move the horizontal and vertical to set the focal point to be behind your tube.
Go to your bottom layer and flood fill it with the gradient. Apply a Gaussian blur set at 8.00
Above your gradient layer paste your close up. Position it where you wish. Duplicate.
On the bottom layer, set the blend mode to Hard Light. On the top close up layer, apply a Gaussian blur set at 1.00. Drop the opacity down to about 50%
Open the star png from the supplies. Copy and paste it above your close up layers. Change the blend mode to soft light. Drop the opacity down to about 65%.
Using your text tool above the star layer, type out rockstar (or whatever you want really) in a nice fat font. I used Velvenda Cooler with a light color that matches the tube.
Drop the opacity down to about 60% and convert to raster layer. Add a gradient glow using the default setting just moved down to a width of 3.0 and the % at 0 with white.
Using your preset shape tool. Draw a few white stars in the corners of the image. Add noise and drop shadow them if you wish.
Now close off the visibility to the main tube layer and the stars you just created. Merge visible. Uncheck them so you can see everything.
Above your top layer. Add a new layer. Select all, Modify, contract 10, invert. Flood fill that area with your gradient. Add noise. Deselect.
Create another layer above that one. Select all. Modify, contract 5, invert. Flood fill with a solid color from your tube. Deselect.
Now you can add your copyright information and your name.
**Quick Tip: If you work with the same artists over and over. It helps to keep a separate psp file with your copyright information already typed up so that all you have to do is copy and paste.**
When you have your copyright information and name finished, you can close off your bottom layer and merge visible.
Open up the supplied animation in AS. Here comes the fun part!
Go back to PSP and uncheck your bottom layer. Activate that layer and hit copy. Over in AS, paste it and then hit Ctrl+l another 28 times. Select all in that animation. Then go to the music note animation and select all there. Copy that one and paste into the new animation you created.
Go back to PSP and activate your top layer. Copy it. Paste it into AS as a new animation. Hit Ctrl+l 28 times again. Select all and copy and paste into the other animation that you placed the music notes.
Save as a .gif. :D
To make a matching avatar. Open a new image with the dimensions of 150x150. Flood fill with the same gradient as before. Copy and paste your tube. Do the same thing as you did before for the borders except on the bottom border, make three different ones with different noise levels. Add your name/letter and copy right information.
Uncheck two of the noise layers. Copy merged. Paste as new animation in AS. Close off that layer in PSP. Open a different noise layer, copy and paste after the current frame in AS. Repeat for the last noise layer. Save as a .gif in AS.
Hope you enjoyed this tutorial. :D
Saturday, October 1, 2011

Supplies:
Tube of choice. I am using the work of Elias Chatzoudis. You can find his art at PTE.
My supplies. You can download these here. Upon downloading them, you agree to not share them or claim them as your own. Direct here for downloads.
Template. I'm using one from Missy. You can find it here.
Filters: Xero-Fritillary and Penta-Jeans
I assume you have working knowledge of Paintshop Pro. This was written using PSP9.
Open temp named finishthisweek28
Expand canvas to a desired size for working.
Copy and paste your tube above the top layer, resize by 80%, sharpen if you wish. Position her where you like.
Activate the bottom layer (should be raster layer 7)
Pick a color from your tube and click the lock transparency button. Flood fill with color of choice. Unclick the lock transparency.
Do the same for the copied layer. (Copy of layer 7)
On those two layers apply Xero-Fritillary on these settings:

If you are feeling frisky, hit random a few times until you see something you like instead.
Now activate the long bar in the middle. (Raster 2).
Choose another color from your tube and flood fill like we did before.
Apply Penta-Jeans on the basic setting.
Activate the black circle (Raster 3). Select all, float, defloat, new raster layer, Expand by 3. Flood fill with white (or another color). Deselect.
Move this layer under raster 3. Apply noise set to 50% and make sure monochrome is checked as well as random.
Activate Raster 3 again.
Apply Fritillary using the same settings as before.
Using your change to target tool, set it to a color from the tube (either from before works) and brush it over the circle.
Using the same tool. Activate each star layer and color them. Feel free to alternate between your color choices.
Activate the back of the film strip (raster 6). Flood fill as we did before with a gradient of choice. I'm using a 45 angle one with two colors from the tube.
Open up your tube again and copy it above that layer a few times. Position it around so it's in the film area.
Merge those tube layers together (just the ones you JUST put there) and then reactivate raster 6. Select all, float, defloat, invert, activate tube layer, hit delete, deselect.
Duplicate that tube layer in the film strip. Set the bottom one to luminance and the top one to screen.
In your supply file you will find a few things to help you decorate the tag, feel free to use them now.
All the elements I used are in there, I'm not going to tell you where to place them, you can do that yourself.
Add drop shadows as you wish. Add copyright info and name. Crop merged opaque. Save as a .png and enjoy!
Subscribe to:
Posts (Atom)
♥ Proud CT ♥

♥Grab my Blinkie♥

♥Places/People♥


