Thursday, May 26, 2011

Supplies
Lisa's Lovely Rainbow Kit. You can purchase this lovely kit here.
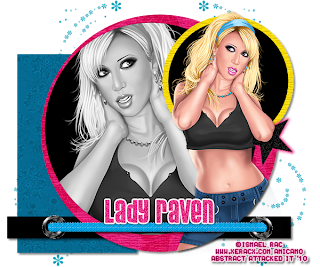
Tube of choice w/close up. I used the art of Ismael Rac. You can purchase a license to use his work here.
Template: Kristins Template114. You can find the download on her blog here.
Font of Choice: I used PussyCat. It can be downloaded for free from here.
Filters
Eye Candy 4000 Gradient Glow.
Eye Candy 4000 Corona.
Here we go!
Open your template. Duplicate as a new image and close the original.
Delete the copyright layer.
Activate the "Purple Circle" layer.
Go to selections. Select all, float, then defloat.
Open your kit. Find a paper. I used Paper13 from the Lisa's Lovely Rainbow kit.
Paste this paper above the "Purple Circle" layer.
Hit invert and then delete. Deselect
Delete the "Purple Circle" layer
Now, activate the "Rectangle" layer.
Go to selections. Select all, float, defloat.
Now open your kit and find another paper. I am using Paper03.
Copy and paste as a new layer above the "Rectangle" layer.
Hit invert and then delete. Deselect
Delete the "Rectangle" Layer.
Activate the "Lrg White Circle" layer.
Go to selections, Select all, float and then defloat.
Add a new raster layer.
Flood fill the new layer with black. (Or any color of your choice) Deselect
Delete the "Lrg White Circle" layer.
Repeat these steps for the "Sm White Circle" layer.
Activate the "Green Circle" layer.
Go to selections, Select all, float and defloat.
Find another paper from the kit. I am using Paper22.
Copy and paste as a new layer. Hit invert and then delete. Deselect
Open your tube of choice.
Use your close up layer. Copy and paste in a new layer above the Large Circle.
Position as you would like.
Activate the Large Circle.
Go to selections. Select all, float, defloat and then invert.
Go to the close up tube layer and hit delete.
Deselect.
On the close up layer. Change the blend mode to "Luminance (Legacy)"
Now open your tube again. This time the normal one, not the close up.
Copy and paste as a new layer.
Position it off to the right. Use my tag as an example if needed.
Activate the large circle that you filled first with the paper.
Go to selections. Select all, float, defloat, and then invert.
Now use your eraser tool to erase the bottom part of the tube that is hanging off. Deselect.
Now open your kit. I am using the Elastic1 element.
Copy and paste it above the tube layer. Position near the bottom.
Find an element you like in your kit. I am using FlowerDust2.
Copy and paste above your background layer.
Duplicate and mirror if needed.
Activate the "Star" layer.
Add noise.
I used it on: Uniform, 50%, Monochrome ticked.
Then I used Eye Candy 4000 Corona. Default settings except the Glow Width is 8.00 and the Flare size is 5.00. You can use the color of choice.
Activate your top layer.
Pick a color from the kit or the tube and set it as your background color. Untick the forground layer.
Use your font of choice and put your name. I put it right along the line of the elastic element.
Convert to raster layer.
Add noise using the same settings as you did on the star layer.
Now use Eye Candy 4000 Gradient Glow. Default settings for fat with Glow width down to 3.00.
Go to the Crop Tool. Crop to merged opaque set to 600x500.
Add drop shadows in the image as you wish.
Add your copyright information and save as whatever format you like.
If you want it transparent, don't forget to delete the background layer ;)
Hope you enjoyed my tutorial. :D
Labels:
Non-Animated,
Scrap Kits
Subscribe to:
Post Comments (Atom)
♥Grab my Blinkie♥

♥ Email Me♥
If you have any questions or want to show off anything you make using my tutorials, feel free to email me.
Please note, if you contact me wishing me to be on your CT, I don't always do tutorials. I am willing to CT, but that fact needs to be taking into consideration.
Please note, if you contact me wishing me to be on your CT, I don't always do tutorials. I am willing to CT, but that fact needs to be taking into consideration.
♥ Comments ♥
Powered by Blogger.


0 comments:
Post a Comment