Thursday, May 26, 2011

This tutorial was written for those with working knowledge of PaintShop Pro.
Supplies Needed:
PaintShop Pro 9 (any other version should work)
Tube of Choice with close up
I used the artwork of Elias Chatzoudis. If you wish to use his tubes you need to purchase them from here.
Elias Stalker Template
Heart Mask 2
(Both by me)
Font of choice. I am using LD Jilly Nilly
Filters Used
Eye Candy 4000-Gradient Glow/Weave
Penta-Dot Cross/Jeans
Eye Candy 5 Impact-Glass (You could also use the glass setting on Eye Candy 4000)
Ok lets get started. :)
Open the template. Duplicate it and close the original.
Delete the copyright layer.
Select the pink rectangles layer. Go to "Selections".
Select all. Then float and defloat the layer.
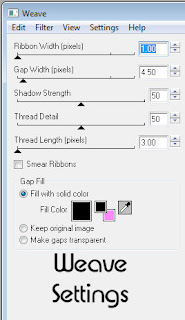
Go to Eye Candy 4000 and apply the Weave filter using the following settings.

Open up your close up of the tube. Copy and paste it into a new layer above the rectangles.
Position and then go to "selections" and hit invert. Hit delete on your keyboard.
Change the blend mode of the tube to "Luminence(Legacy)"
Deselect all.
Select the rectangle layer again. Add a drop shadow of choice. I used mine with the settings of 4,2, 45, 7.00.
Select the black bars layer now. Go to selections. Select all, float/defloat again.
Now take a color from your tube and black. Make a foreground to background gradient with the following settings.
Linear
Angle: 325
Repeats:5
Invert checked
Fill the black bars with the gradient.
Go to "Adjust" and hit blur. Use a Gaussian Blur set to 20.00.
Now use Penta's Dot and Cross filter with the settings 63, 19, 0.
Add drop shadow of choice. Deselect all.
Select the grey heart layer. Go to selections. Select all, float/defloat again.
Fill with black.
Apply Penta Dot and Cross with the same settings as before.
Then apply Eye Candy 4000 Weave with the same settings.
**It should be automatically the same as last used**
Deselect all.
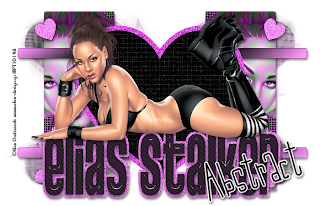
Now move the word art layers down on the tag. Feel free to use my tag as a guide as to where they go.
Open your tube up. Copy and paste it as a new layer above the word art. Position. (Use my tag as a guide)
Add drop shadow of choice.
Now select the little hearts layer. Go to selections. Select all, float/defloat again.
Fill with the tube color you used in the gradient. Go to "Adjust" and hit add noise. I had it set on Uniform/50%/Monochrome checked.
Drop shadow if you wish.
Select the black letters layer. Go to selections. Select all, float/defloat.
Now make a new layer above that one.
Apply Eye Candy 5 Impact Glass on the default settings using the color from the tube.
Activate the black letters layer again. Apply Penta Jeans set to 23,10.
Deselect.
Add drop shadow to the glittered words layer if you wish.
Now make a new layer and put it at the bottom of all of the current layers.
Fill with the fore/back gradient.
Apply the Heart Mask. Merge group.
Now using the font of choice, type out your name in black. Position using my tag as a guide. Convert to raster layer.
Apply Eye Candy Gradient Glow. Have it on Fat with the width set at 3.0 and soft corners 0%
Drop shadow if you wish.
Add artist information and copyright.
Save as a .png. :)
Hope you enjoyed my tutorial. ^^
Supplies Needed:
PaintShop Pro 9 (any other version should work)
Tube of Choice with close up
I used the artwork of Elias Chatzoudis. If you wish to use his tubes you need to purchase them from here.
Elias Stalker Template
Heart Mask 2
(Both by me)
Font of choice. I am using LD Jilly Nilly
Filters Used
Eye Candy 4000-Gradient Glow/Weave
Penta-Dot Cross/Jeans
Eye Candy 5 Impact-Glass (You could also use the glass setting on Eye Candy 4000)
Ok lets get started. :)
Open the template. Duplicate it and close the original.
Delete the copyright layer.
Select the pink rectangles layer. Go to "Selections".
Select all. Then float and defloat the layer.
Go to Eye Candy 4000 and apply the Weave filter using the following settings.

Open up your close up of the tube. Copy and paste it into a new layer above the rectangles.
Position and then go to "selections" and hit invert. Hit delete on your keyboard.
Change the blend mode of the tube to "Luminence(Legacy)"
Deselect all.
Select the rectangle layer again. Add a drop shadow of choice. I used mine with the settings of 4,2, 45, 7.00.
Select the black bars layer now. Go to selections. Select all, float/defloat again.
Now take a color from your tube and black. Make a foreground to background gradient with the following settings.
Linear
Angle: 325
Repeats:5
Invert checked
Fill the black bars with the gradient.
Go to "Adjust" and hit blur. Use a Gaussian Blur set to 20.00.
Now use Penta's Dot and Cross filter with the settings 63, 19, 0.
Add drop shadow of choice. Deselect all.
Select the grey heart layer. Go to selections. Select all, float/defloat again.
Fill with black.
Apply Penta Dot and Cross with the same settings as before.
Then apply Eye Candy 4000 Weave with the same settings.
**It should be automatically the same as last used**
Deselect all.
Now move the word art layers down on the tag. Feel free to use my tag as a guide as to where they go.
Open your tube up. Copy and paste it as a new layer above the word art. Position. (Use my tag as a guide)
Add drop shadow of choice.
Now select the little hearts layer. Go to selections. Select all, float/defloat again.
Fill with the tube color you used in the gradient. Go to "Adjust" and hit add noise. I had it set on Uniform/50%/Monochrome checked.
Drop shadow if you wish.
Select the black letters layer. Go to selections. Select all, float/defloat.
Now make a new layer above that one.
Apply Eye Candy 5 Impact Glass on the default settings using the color from the tube.
Activate the black letters layer again. Apply Penta Jeans set to 23,10.
Deselect.
Add drop shadow to the glittered words layer if you wish.
Now make a new layer and put it at the bottom of all of the current layers.
Fill with the fore/back gradient.
Apply the Heart Mask. Merge group.
Now using the font of choice, type out your name in black. Position using my tag as a guide. Convert to raster layer.
Apply Eye Candy Gradient Glow. Have it on Fat with the width set at 3.0 and soft corners 0%
Drop shadow if you wish.
Add artist information and copyright.
Save as a .png. :)
Hope you enjoyed my tutorial. ^^
Labels:
No Scraps,
Non-Animated
Subscribe to:
Post Comments (Atom)
♥Grab my Blinkie♥

♥ Email Me♥
If you have any questions or want to show off anything you make using my tutorials, feel free to email me.
Please note, if you contact me wishing me to be on your CT, I don't always do tutorials. I am willing to CT, but that fact needs to be taking into consideration.
Please note, if you contact me wishing me to be on your CT, I don't always do tutorials. I am willing to CT, but that fact needs to be taking into consideration.
♥ Comments ♥
Powered by Blogger.


0 comments:
Post a Comment